This post is made to help you get started with customizing the Cireson self-service Portal, but also includes a collection of customization code examples and tips you perhaps didn’t know about. The blogpost will mainly focus on customization done in CSS and Javascript/jQuery and not the customization you can do via the Cireson administration GUI or JSON files. If you are new to the Cireson Portal I would recommend you to read up on some of the good knowledge articles Cireson has on the topic. I’ve gathered a list here which also include some external ressources from the community.
| Link | Description |
| How To Customize the Cireson Portal | This include how to CSS customize the portal (look and feel) Creating your own translations (overriding strings) Custom logo |
| Customizing the Self-Service Portal – Webinar video | Travis Wright walktrough on how to customize the portal. CSS, Custom Tasks, Logos etc. |
| Alternate Service Catalog with Layout Options | Different CSS examples on how to customize the home page |
| How to Create Custom Form Tasks | Different Form Task examples written in javascript/jQuery |
| Advanced Custom Task Example | Example on how to create a Resolve Incident task |
| Build your own “Cancel Incident” task for Cireson self-service portal | By Stefan Johner: How to make a custom “Cancel Incident” task |
| How To Create Custom Forms for Cireson Portal | How to customize forms (e.g. the Incident form) on the portal via the provided JSON files. Ex. inserting new fields, change size of fields etc. |
| Advanced Cireson Service Manager Portal Customizations | Only inspirational link to get a glimpse of some of the possibilities. Does not include how-to. |
Other useful ressources:
The Cireson Portal is an HTML5 webportal, this means it’s definitely an advantage to familiarize yourself with the following technologies: HTML, CSS, Javascript, and jQuery. Especially Javascript and jQuery is where the fun begins in terms of making your portal more interactive and intelligent. Whereas CSS is about customizing the look and feel of the portal. Doing CSS and Javascript/jQuery customization is not always easy since not all elements on the HTML pages (the DOM) has an Id or an exclusive class to target. Therefore, some things requires a little creativity in order to target exactly what you want to customize, though it is getting alot better. A great site to get started with the fundamentals of web technologies is codeacademy where in only a few hours you can learn the basics of HTML, CSS, and jQuery that will get you a long way of doing customization.
CSS Customization:
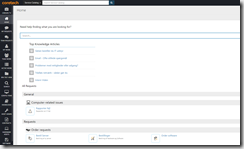
CSS customization handles how your Portal looks and involves design choices like the type of font to use, the color on the elements, alignments of elements, hiding elements, custom logos / icons, size of your icons and lots more. The below screenshots show the Home Page with two different custom css stylesheets applied on the same site to show how different it can look:
The first version is a simple stripped-down home page where alot of elements have been hidden and the icons made bigger. The other is more close to the default home page, though with some customization of icons on the Service Offering, different colours etc. You could then choose to make the simple version only present for end-users and the more “advanced“ version only present for analysts (example of this below).
All your CSS customization goes in the file custom.css located in your CiresonPortal folder: \CustomSpace. This will then overrule the original stylesheet for those elements changed.
The best way to directly test and play around with your styling is to use the developer tool (F12) in your favorite browser and then modify the attributes there:
Example: Hiding the “Home” title text in the top of the home page:
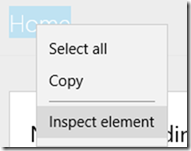
1) Right-click on the Home text and click Inspect element:
2) This takes you inside the DOM explorer which is sort of the structure of the webpage and marks the place where the “Home” text is located. On the right side you have the Styles you can modify and the precise element you just selected. Now, as said before, not all elements have an exclusive class or a unique Id. In this case the closest we get is the .page-title class that is placed inside the .page_bar class. This is indicated by a space between: .page_bar .page_title
You could, as shown on the screenshot above, just make a new property of visibility and set the value to hidden. If you do this, you can see the effect immediately (Home text is gone). And you can then take the code: .page_bar .page_title { visibility: hidden;} and paste it inside the custom.css file. However, this will unfortunately also hide the page title on all the other pages, or in other words: on all the places where .page_bar .page_title is used. So how do we only target the Home text ? CSS can do contains logic on an attribute, example:
/* All links with "example" in the url have a grey background */
a[href*="example"] {background-color: #CCCCCC;}
But unfortunately, you cannot select an element in css based on element text. To do this, we can use jQuery contains() method. This code is put in the custom.js file (example below).
Creating a logo in the top navigation bar:
Custom.css code:
/* Header - logo */
.navbar h4 {
    text-indent: -2000px; /* Optional this hides the portal name text */
    width: 117px;
    background-image: url("/CustomSpace/yourlogo.png");
    background-repeat: no-repeat;
    background-size: auto 21px;
    /*Optional positioning methods:
    background-position-x: 10%;
    background-position-y: 40%;
    padding-left: 65px;
    */
}
Creating icons in front of the Service Offering text:
The black hand icon is added to the Service Offering “Order requests”.
/* Order Requests */
h4#a29d8976-bfae-c4f0-16ef-3dd28b64afda {
    background-image: url(/CustomSpace/OrderRequest.png);
}
Making a blue solid border around the request offering icons (as shown above)
/* Home page - Icons */
img.cursor-pointer.sc-item-image {
    border: solid !important;
    border-radius: 10px;
    padding: 15px;
    color: #d6effa;
}
jQuery is a Javascript library with the purpose of making it much easier to use Javascript on your website. It’s easy to select the element(s ) you want to change and it has tons of methods to modify and animate elements on the page with. Cireson uses a combination of Javascript and jQuery to make most of the logic on the pages and tasks. You can make your own customization in file custom.js located in your CiresonPortal folder: \CustomSpace.
The best way to test and try it out before making any customization, is again using the Developer Tool in your favorite browser. Just like CSS, only here you use the Console to play around with logic:
Inside a workitem form, you can use the pageForm.viewModel.<property> to select properties and view their values.
Creating custom tasks
I will not go into much detail here, but recommend you read the KB article from Cireson on the topic. In order to make a custom task you need to target the workitem class of where the task should be put.
Example:
app.custom.formTasks.add('Incident', "YourIncidentTask", function (formObj, viewModel) {
    //Code to execute
});

app.custom.formTasks.add('ServiceRequest', "YourServiceRequestTask", function (formObj, viewModel) {
    //Code to execute
});
I have made a Send Email custom task you can take a look at.
Hiding “Home” text on the Home page (example of modifying elements on a page not achievable via CSS)
$(document).ready(function (formObj) {
/*Hide "Home" page title */
    function hideHomeTitle()
    {

        $(".page_bar .page_title:contains(" + localization.Home + ")").hide();

    }

/*Execute the hide home title after 1 second */
setTimeout(hideHomeTitle, 1000);

// ...
// Any more of your custom code for non-workitem pages (like the Home page)
// ...
});
As for now, even though the DOM is fully loaded, we still need to create a small delay (setTimeout) before calling the function, otherwise the effect will not be seen. Admittedly, it is not the most beautiful method, but it works for now until Cireson provide a better way to achieve this (I will update the post then).
Another method to use is to add your own class to the Home title:
/* Home title */ .HomeTitle { color: #ffffff; font-family: "Arial" !important; }
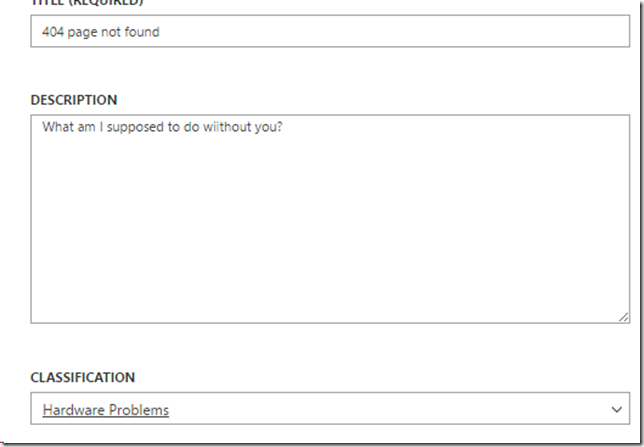
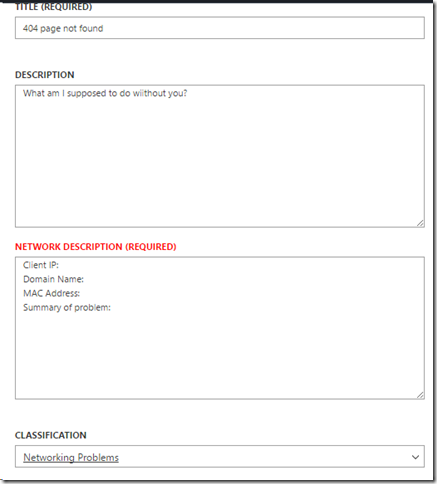
Showing a new field ‘Network Description’ on Incident form when Networking Problems has been selected from Classification categories (example of custom control on a form):
//*********************************************************
//Classification Control
//Show new text field when Networking category is selected.
//Make this new field required and red to emphasize it.
//*********************************************************
app.custom.formTasks.add('Incident', null, function (formObj, viewModel) {

   //Incident OnReady
   formObj.boundReady(function () {

        //Code here will run when the Incident form has loaded.

        //Get the Network Description label
        var networkDescriptionLabel = $(".form-group label[for='NetworkDescription']");

        //Get the Network Description field. We use next here as we know the next element on the DOM will be the field.
        var networkDescriptionField = networkDescriptionLabel.next();

        //Collapse Network Description label and field by default:
        networkDescriptionLabel.hide();
        networkDescriptionField.hide();

        return;
    });


   //Incident Classification changed
    formObj.boundChange("Classification", function () {
    //Code here will run every time the Classification category picker is changed.

        //Get the Network Description label
        var networkDescriptionLabel = $(".form-group label[for='NetworkDescription']")

        //Get the Network Description field. We use next here as we know the next element on the DOM will be the field.
        var networkDescriptionField = networkDescriptionLabel.next()

        //If Classification 'Networking problems' is selected
        if (viewModel.Classification.Id == 'b66fe115-9fe8-f1dc-b963-4ce3a82d671e')
        {
            //Show Network Description label and field
            networkDescriptionLabel.show();
            networkDescriptionField.show();

            //Set Network Description field required, make it red and write (Required)
            networkDescriptionField.attr('required', 'true');
            networkDescriptionLabel.text("Network Description" + " (Required)");
            networkDescriptionLabel.css('color', 'red');

            //Write some guiding text inside the Network Description field:
            var helpText = "Client IP:\n\Domain Name:\nMAC Address:\nSummary of problem:";
            networkDescriptionField.val(helpText);

        }else{
            //Reset back to default if another category is selected
            if (networkDescriptionField.attr("required") != undefined)
            {
                networkDescriptionLabel.hide();
                networkDescriptionField.hide();
                networkDescriptionField.removeAttr('required');

            }

        }
        });
        return;
});
This is an example of how to make custom controls on your work item form. This can be useful if you want to create dependencies on your form like making fields required/enabled/disabled dependent on something else the user has selected. There are some prerequisites to the example above: First you need to extend the Incident class with a new string property called NetworkDescription (using Authoring Tool or VSAE) and then you need to include that field in the Incident.js file put in the \CustomSpace folder (KB article on customizing forms):
Make icons on Homepage clickable:
$(document).ready(function () {

    /* Make icons clickable */
    $('body').on('click', '.media-link', function () {

        var $this = $(this);
        $nextAnchor = $this.next().find('a').find('span');
        $nextAnchor.trigger('click');
        $nextAnchor.get(0).click();

    });

});
Differentiate your portal look based on roles
The below code shows an approach to apply a specific css stylesheet if the user is an End-User
/* END-USER CUSTOM STYLE */
if (!session.user.Analyst) {

    loadCSS = function(href) {

        var cssLink = $("<link>");
        $("head").append(cssLink);

        cssLink.attr({
            rel:  "stylesheet",
            type: "text/css",
            href: href
        });

    };
    loadCSS("/CustomSpace/enduserCustom.css")

    //Some other custom code only applicable for end-users


}

/* /END-USER CUSTOM STYLE */
Scripting on specific pages
Just like the Home title was customized via Javascript code in custom.js file, you can also do logic on specific pages.
The example below shows a way to make custom code on a specific request offering:
$(document).ready(function (){
   if(window.location.href.indexOf("2d460f1a-9db7-c948-d20f-74c861c5fa96,dda75f78-440e-c181-46cc-8f27036b0732") > -1){
      console.log("I'm on the Request Offering: Bestillinger!");

      setTimeout(function (){
         //Execute order 66 custom code
      }, 500);
   }
});
Customize Request Offerings
This is actually a tip I discovered rather recently, around the launch of the portal v2 (It should work in MS’ own portal as well)
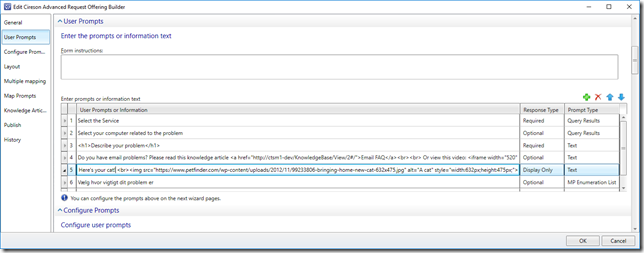
The tip is simple: you can actually use HTML in the Request Offering wizards! When you create a new Request Offering in the SCSM Console you can insert HTML tags within the user prompts or other places with textfields:
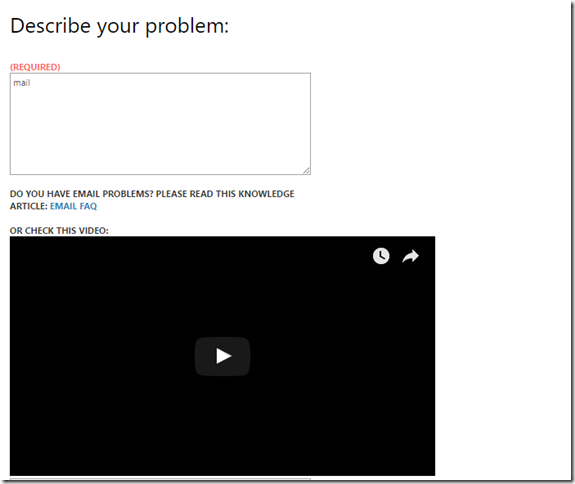
Here I’ve utilized Cireson’s Advanced Request Offering (but it works for normal offerings too) to show an embedded youtube video if the user write the words ‘mail’ or ‘outlook’ in the problem description:
You cannot insert Javascript code though, only HTML. To do some scripting logic on a Request Offering, check the example above to target a specific page in your custom.js file.
Hope this was helpful, please share your own customization or tips and I will put it on the blogpost ![]()

