I have always loved the DriverPaths1=\\server\path\%model% part of BDD\MDT because it enabled you to have all your model specific drivers in a corresponding folder rather than a repository.
SCCM pretty much forces you to use repositories…. I know that you can create different driver packages and categorize your drivers, thereby enabling you to only use specific drivers. However, you then have to create a bunch of IF statements, to make this a reality.
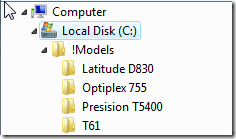
The BDD/MDT way is to add the “DriverPaths1=\server\path\%model%” to your CustomSettings.ini, and then create a folder structure looking something like this:
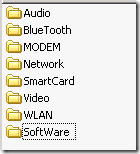
Each folder would then contain the drivers deeded by that exact PC model, and nothing else (well maybe model specific software that you need to install eg. DVDplyer, Burning SW etc.)
A typical Model specific folder could look like this:
Now, what would happen during the deployment was an automatic copy of every folder to C:\drivers of the machine being imaged, and then an update of the Registry DevicePath, enabling mini setup to do PnP detection.
Actually the same thing happens when SCCM looks for drivers to use during the TS step “Auto Apply Drivers” or “Apply Driver Package”. SCCM takes all suitable drivers and copies them to C:\drivers, and calls the folders 1, 2, 3, etc.
To make use of Driverpaths1 in SCCM we need to do a couple of things:
1. install MDT on your SCCM server, and configure the a distribution share directory (we nee to do this to gain easy access to the files we need)
2. Configure ConfigMgr integration
3. create a package (called Toolkit) containing the following MDT Folders, copied from the MDT directory share.
5. in the control folder add a file named Drivers.xml, and DriverGroup.xml (the files do not need to contain anything exept <drivers /> and <driverGroup /> ).
6. Scripts, Servicing and Tools contains the standard MDT files.
We are now ready to integrate driver injection into our Task sequence.
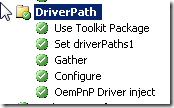 |
Just after the Apply Operating System task you need to add some extra tasks. |
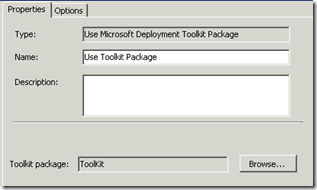 |
1. To gain access to the Toolkit package you just created , click Add – MDT – Use Toolkit package and point to the package. |
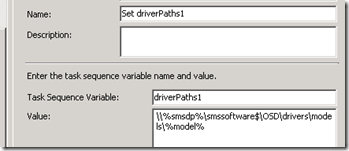 |
2. You then have to set the DriverPaths1 variable so that SCCM knows where to look for drivers. Click Add – General – Set Task sequence Variable.In Task Sequence Variable: Type DriverPaths1 In Value: type in \\%SMSDP%\”DP”\”PackagePath\%model% (%smsdp% and %model% will automatically be set to values, gathered in the next step) |
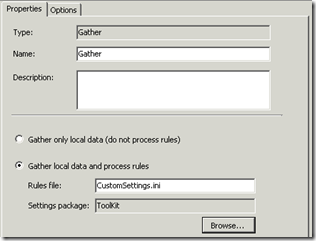 |
3. It is now necessary to gather info on the the system, and set some variables. Click Add – MDT – Gather .It is not necessary to point to any CustomSettings.ini file but you must choose a package ( you can however create an CS.ini if you like to have different models/model names, point to the same folder. Here the Customsettings.ni is placed in the root of the toolkit package) |
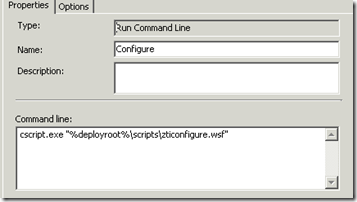 |
4. next you have to run the ZTIconfigure script that writes stuff to your answer files. Click Add – General – Run Command line .In Command Line: type in cscript.exe “%deployroot%\scripts\zticonfigure.wsf”
Note:ZTIconfigure will also write any MDT syspep variable into sysprep.inf. so if you set TimeZone and SystemLocale in your collection variables, they will be written to sysprep. |
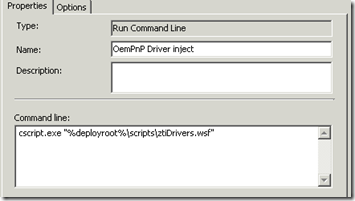 |
5. finally you have to run the ZTIDrivers script that takes care of copying drivers to C:\drivers. Click Add – General – Run Command line .In Command Line: type in cscript.exe “%deployroot%\scripts\ZTIDrivers.wsf”
|
You are now able to install images using driver from a folder you yourself create and maintain, making sure only your selected (and tested) drivers are available during deployment.
_____________________________________________________________________________________________________________________


At step 3 where do I have to create that package? I have Control, Scripts and Tools but not Servicing in my distribution share
Hi
Your screenshot with the gather package is wrong. It should have the gather package and not the toolkit package selected.
The Drivers.xml, and DriverGroup.xml needs to have a top level header, like this.
Besides this, thanks a lot for this guide. :o)
Top level header [CODE][/CODE]
Argh needs to be ___ without the _
I give up. See this link http://www.experts-exchange.com/Web/Web_Languages/XML/Q_21286136.html