One of the new features of Azure Automation is still somewhat hidden. It needs to be enabled before you see it in the GUI
This blog post gives a quick overview of what is needed to use it.
Step 1: Enable the extension in your Azure Account
#Add & Select Account
Add-AzureAccount
Switch-AzureMode -Name AzureResourceManager

#Register DSC extension on account
Register-AzureProvider –ProviderNamespace Microsoft.Automation
Register-AzureProviderFeature -FeatureName dsc -ProviderNamespace Microsoft.Automation
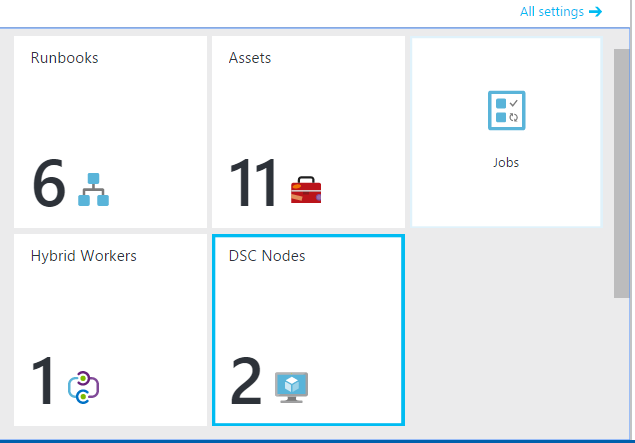
The command registers the azure automation dsv extension on your account. This shows the DSC Nodes tile in your automation account:
Step 2: Select subscription and default values
Before you can run any command you will need to select your subscription.
additionally each of the command needs 2 values ResourceGroupName and AutomationAccountName To keep the code easy to read, you can use the $PSDefaultParameter values to save the values
#select subscription
Switch-AzureMode AzureResourceManager
Get-AzureAccount
Select-AzureSubscription "InsertYourSuscriptionName"

#Default settings for all cmdlets
$PSDefaultParameterValues = @{
                                "*AzureAutomationDsc*:ResourceGroupName" = "YourResourceGRoupName"
                                "*AzureAutomationDsc*:AutomationAccountName" = "YourAutomationAccountName"
                            }

get-command *azureautomationdsc*
Step 3: Write configuration
A DSC configuration needs to be created. This example is very simple and will end up having the configuraiton name “psug.webserver”
Configuration PSUG {
   Node "webserver"
    {
         #Install the IIS Role
        WindowsFeature IIS
        {
          Ensure = "Present"
          Name = "Web-Server"
        }
    }
}
Create and save this file as PSIUG.ps1
NB! it is important that the filename is the same as configuration name.
Step 4: Import and Compile configuration
Next step is to import and conpile the configuration for your DSC node.
the import will upload your file to Azure automation DSC (will not be shown in any gui yet) after the import, the configuration needs to be compiled to be used on your machines. This will generate a configration called configurationName.NodeName in this example psug.webserver
#Import Config & compile
Switch-AzureMode AzureResourceManager
Import-AzureAutomationDscConfiguration -SourcePath E:\Data\Scripts\PS\DSC\configs\PSUG.ps1  -Published -Force
Start-AzureAutomationDscCompilationJob -ConfigurationName "psug"

Get-AzureAutomationDscCompilationJob #check status is completed on combilation job

Get-AzureAutomationDscNodeConfiguration #check that psug.webserver has appeared
Step 5: Create or Register machine / node
this code snippet contains a few example to check the node and unregister
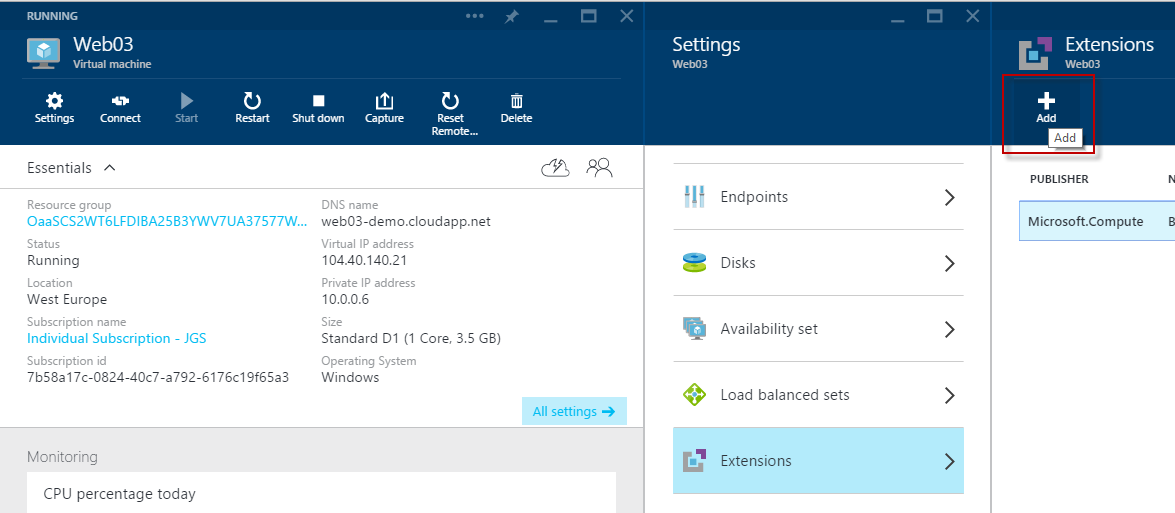
To add the extension to an existing machine using Azure Preview Portal:
1. Open Machine overview
2. Click “all Settings”
3. Select “extensions”
4. Click Add
5. Select “Azure Automation DSC”
6. Click Create
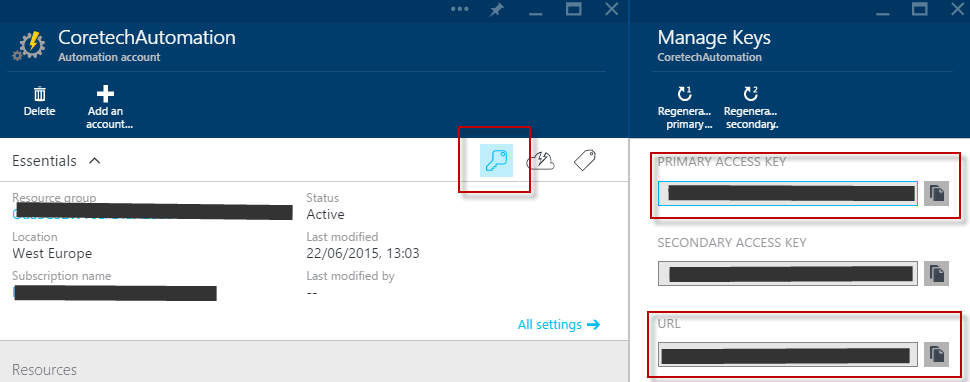
7. Set Registration URL and Key. These can be found in the dashboard of the automation account as seen in this picture:
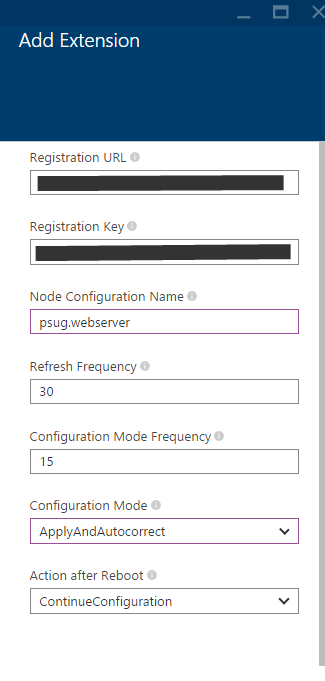
8. Set Trigger intervals and configuration mode.
In the example we use “applyandautocorrect” whcih will keep the machine compliant in the future
Read more about the options available here:
https://technet.microsoft.com/en-us/library/dn249922.aspx
9. Click OK
You can use the same technique when creating a new Azure Machine.
It can also be created from PowerShell using the example from the documentation.
Documentation:
https://azure.microsoft.com/en-us/documentation/articles/automation-dsc-overview/
Other commands
this code snippet contains a few example to check the node and unregister
#Get all nodes Status
Get-AzureAutomationDscNode  |fl *

#Check latest node result for node WEB2
$Node  = Get-AzureAutomationDscNode -Name WEB02
Get-AzureAutomationDSCNodeReport  -NodeId $Node.ID | Sort EndTime | Select-Object -last 1

#unregister node
#Get-AzureAutomationDscNode -Name WEB01  | select-object -first 1 |Unregister-AzureAutomationDscNode



Hi,
Is there a cmdlet to install the Azure Automation DSC Extension on a server created in the Azure Resource Manager api (not a classic server)?
Thanks.
Hi Andrea. I have the same problem. I figured out this much:
Set-AzureRmVMDscExtension -ResourceGroupName “resourcegrpname” -VMName “vmname” -ArchiveBlobName “PSUG.ps1.zip” -ArchiveStorageAccountName “storageaccountname” -ConfigurationName “PSUG” -Version “2.8” -Location “JapanEast”
Except, provisioning failed =( and I am stuck with what to do from here…
Get-AzureRmVMDscExtensionStatus returns:
ResourceGroupName : xxxx
VmName : xxxx
Version : 2.8
Status : Provisioning failed
StatusCode : ProvisioningState/failed/8
Timestamp : 11/02/2016 4:40:39 AM
StatusMessage : DSC Configuration completed with error(s).
DscConfigurationLog : {Perform operation ‘Invoke CimMethod’ with following parameters, ”methodName’
= SendConfigurationApply,’className’ =
MSFT_DSCLocalConfigurationManager,’namespaceName’ =
root/Microsoft/Windows/DesiredStateConfiguration’., The WinRM client cannot
process the request. If the authentication scheme is different from Kerberos,
or if the client computer is not joined to a domain, then HTTPS transport must
be used or the destination machine must be added to the TrustedHosts
configuration setting. Use winrm.cmd to configure TrustedHosts. Note that
computers in the TrustedHosts list might not be authenticated. You can get
more information about that by running the following command: winrm help
config., Operation ‘Invoke CimMethod’ complete., Time taken for configuration
job to complete is 2.906 seconds}