Installing Active Directory Domain Services on Windows Server Core is really easy. You only need to run 8 commands and your Domain Controller is ready. These steps are:
1. Rename the server
2. Set the IP and DNS address
3. Install Active Directory Domain Services Server Role
4. Promote the server to a Domain Controller
Let’s Get Started 🙂
I assume that you already have one Windows Server Core installed. If you log in, then it automatically runs command prompt.
To get to PowerShell, then just type PowerShell.exe and you are ready to configure your Domain Controller.
I don’t like that PowerShell Console because it has a black background. If you want the right PowerShell Console, then you can run the Task Manager and execute the PowerShell Console from there and then you will get the better Console 🙂
Step 1
So Step 1 is to rename the server that it has the correct name. In PowerShell you can use Rename-Computer cmdlet to change name.
After that restart the server using Restart-Computer –Force command. After the reboot you can execute $env:COMPUTERNAME to verify the server name. $env:COMPUTERNAME is a PowerShell environment variable.
Step 2
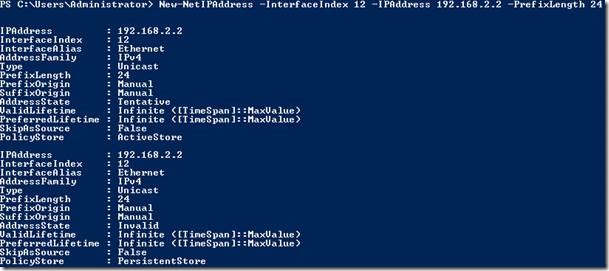
If the server name is OK, then we can configure the server IP and DNS address. We can use New-NetIPAddress cmdlet to set static IP address and Set-DNSClientServerAddress cmdlet to set the DNS address. Before you start configuring network adapter you need to know network adapter interface index. To get the correct network interface index we can use Get-NetAdapter cmdlet.
In this case the network adapter interface index is 12.
Run the following command to set the IP Address
Run the following command to set the DNS Address
Step 3
Next step is to install the Active Directory Domain Services server role and to install server roles and features we can use Install-WindowsFeature cmdlet.
Step 4
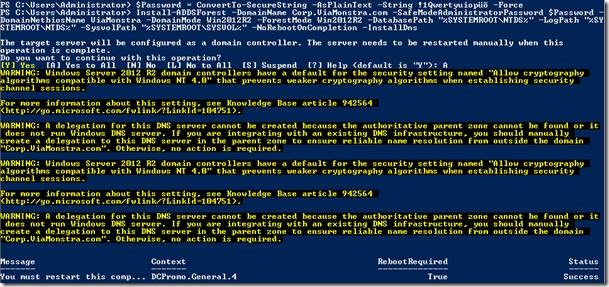
Last step is to promote the server to a Domain Controller. To promote the server to a Domain Controller, then first we need to convert Safe Mode Administrator Password to a Secure String and for that task we can use ConvertTo-SecureString cmdlet. If we have the secure string, then we can execute the Install-ADDSForest cmdlet.
As you see, it is really easy to install Active Directory Domain Services on Windows Server Core. Domain Controller is a really good example that can run on Windows Server Core. If your Domain Controller is ready, then you can enable the remote management using Enable-PSRemoting cmdlet and then you can manage your server remotely.
Here are all the commands.
#Step 1
Rename-Computer -NewName DC01
Restart-Computer -Force

#Step 2
New-NetIPAddress –InterfaceIndex 12 –IPAddress 192.168.2.2 -PrefixLength 24
Set-DNSClientServerAddress –InterfaceIndex 12 -ServerAddresses 192.168.2.2

#Step 3
Install-WindowsFeature -Name AD-Domain-Services

#Step 4
$Password = ConvertTo-SecureString -AsPlainText -String !1Qwertyuiopüõ -Force
Install-ADDSForest -DomainName Corp.ViaMonstra.com -SafeModeAdministratorPassword $Password `
-DomainNetbiosName ViaMonstra -DomainMode Win2012R2 -ForestMode Win2012R2 -DatabasePath "%SYSTEMROOT%\NTDS" `
-LogPath "%SYSTEMROOT%\NTDS" -SysvolPath "%SYSTEMROOT%\SYSVOL" -NoRebootOnCompletion -InstallDns -Force

#Step 5
Restart-Computer -Force


Thanks for sharing! Good post, helped me a lot!
Thank you very much for the instruction. It’s very good and so helpful.
Excellent instructions, very helpful, thank you 🙂
Excelente post, me fue de gran utilidad.
Muchas Gracias
Julián Castiblanco
Bogotá,Colombia
Thanks – this helped my optimise my own scripts 😉
You can actually cut away two commands by doing this:
Rename-computer -NewName DC01 -Force -Restart
and by omitting the -NoRebootOnCompletion parameter in the Install-ADDSForest cmdlet
nicely said… post more …
ceedo you mind if i ask you how did you make this blog and when did it post the next topic cause i been waiting for months now actually my friend always talk that about your blog have an fantastic kn.egedlwo.ff
Hey Paul, lol I just wanted to know how you liked the tornado weather here in Kansas on saturday? I hope ya’ll made it safe back to Atlanta, I wanted to get a picture with you guys but Asa interrupted… Oh well. It just gives me an excuse to go to another one of your concerts(:
[…] http://blog.coretech.dk/kaj/installing-active-directory-domain-services-on-windows-server-2012-r2-co… (Helps configure AD) […]
I'm stopping right over!! I just want one of each, please, and will enjoy the fellowship with you. Your pictures turned out great!! Thanks for sharing these over at WholeHearted Home…I hope lots of people stop by and read this post.
Test-ADDSForestInstallation
why does this command fail?
$Password `
“%SYSTEMROOT%\NTDS” `
the Install-ADDSForest is one line, so why do i see ‘ on the line?