Lately I have done a lot of Secunia CSI installations. One of the questions that keeps coming up is “what client scanning options do we have, if we do not install the CSI agent locally?”. You basically have three options as described below.
Software Inventory
You can use ConfigMgr Inventory and gather information about *.EXE, *.OCX and *.DLL files. This process will get the job done although you are gathering much more information than CSI requires. This method requires that the Site Server (where you installed CSI) have access to the Cloud based database hosted by Secunia.
Network scanning
Perform a network scanning works nicely in a small lab enviroment, but I often find it to be to unrealiable when working in the “real world”.
Create a ConfigMgr package
The CSI agent dosn’t really have to be installed on the local host in order to do the scanning. I often create a traditional package in ConfigMgr and run the scan on a weekly basis. This approach requires that each of the clients will have Internet access and can connect to the CSI Cloud based database. In order to run the agent inside a ConfigMgr package follow these steps:
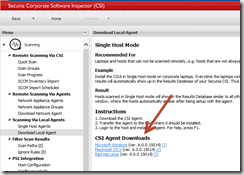
- Open the Secunia CSI console, from Scanning, Scaning Via Local Agents, Download Local Agent click Microsoft Windows and download the latest CSI agent.
- Launch the ConfigMgr console, select Software Library. Application Management, Packages.
- From the ribbon click Create package.
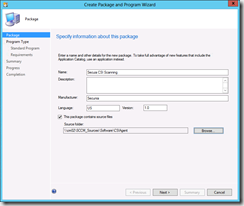
- Fill in the package information and click Next.
- On the Program Type page, ensure Standard program is selected and click Next.
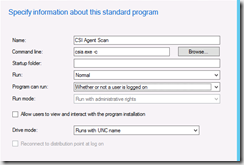
- On the Standard Program page, configure these settings and click Next.
Name: Secunia: CSI Agent Scan
Command line: csia.exe -c
Program can run: Whether or not a user is logged on - On the Requirements page, click Next.
- Finish the wizard
- Distribute the package to all Distribution Point groups using the Distribute Content feature.
Create the weekly scan
- Select the Package and click Deploy on the ribbon.
- On the General page, select the target collection and click Next.
- On the Content page, verify that the content is distributed and click Next.
- On the Deployment Settings page, ensure the purpose is Required and click Next.
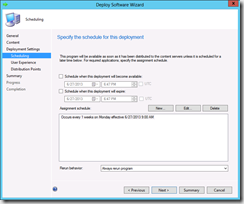
- On the Scheduling page, in Assignment schedule click New and create a weekly scanning schedule. Also configure the deployment to Always Rerun.
- On the user Experience page, click Next.
- On the user Distribution Points page, click Next.
- Finish the wizard.
You will be able to monitor the scanning result from the CSI console.


[…] How to run Secunia CSI scanning without installing the CSI agent […]
So what’s the downside of just installing the Secunia Agent on all computers? It seems like the amount of overhead is worth the benefits you get of having the agent installed locally, especially when it comes to road warriors who might not check into SCCM for a couple weeks at a time.
On that note, can you Configure the Secunia Agent to operate in a way that it updates the users machine when they are online, but not necessarily connected back to the main office (SCCM).
If you wish for to obtain a great deal from this article then you have to apply such strategies to your won webpage.
When I initially commented I clicked the “Notify me when new comments are added” checkbox and now each time a comment is added I get four emails
with the same comment. Is there any way you can remove me from that service?
Appreciate it!
im only in sixth grade and this is something that i would really want to do when I’m older is to become a criminal investigator/special agent this is something that really I want to do i will take the collage crores to get in stay in collage as long as i would need thank you for listening
sincerely- Hailey Joy
Hailey, I am not sure if you are joking – But this is not CSI as in Crime Scene Investigation but I guess the key to succeed as an investigator is keep yourselves focussed