In Part I focused on installing and configuring Secunia CSI 7 and System Center 2012 R2 ConfigMgr. In this part I will explain how you can deploy software updates. I do anticipate that you already have a working Software Update Management infrastructure managed by System Center 2012 R2 ConfigMgr.
Deploying 3rd party software updates
The process of deploying 3rd party software updates can be initiated from the CSI web portal or using the System Center 2012 R2 ConfigMgr plugin. In my world updates are divided into two categories:
- Applications managed and supported by the organization. In this category I often find applications like, JAVA, Adobe Reader, Adobe Flash, Google Chrome, Firefox etc.
- Applications installed but not managed or deployed by you. In this category I often find applications like, Apple Quicktime, Itunes, VLC player, Filezila.
Even if you are “only” managing applications in category 1, it’s still important to have a policy and process for managing the other application. If you don’t feel you are responsible for category 2 updates – give it two seconds; who do you think will be held accountable for a virus outbreak in the organization and who will be cleaning up the mess! Odds are; that you will be involved and maybe even put to blame.
My process is fairly simple, category 1 updates must be managed and deployed just like the original application. What I mean by that, is if you used a transforms file to deploy Adobe Reader, you better make sure the update is not changing those settings. Proces for updates in category 2 – I couldn’t care less, its all fire and forget, no questions asked. I just want to make sure all are using the latest secure version of the product.
Deploy software updates
In the example below I will take you thru the wizard and deploy latest security update to Apple Quicktime.
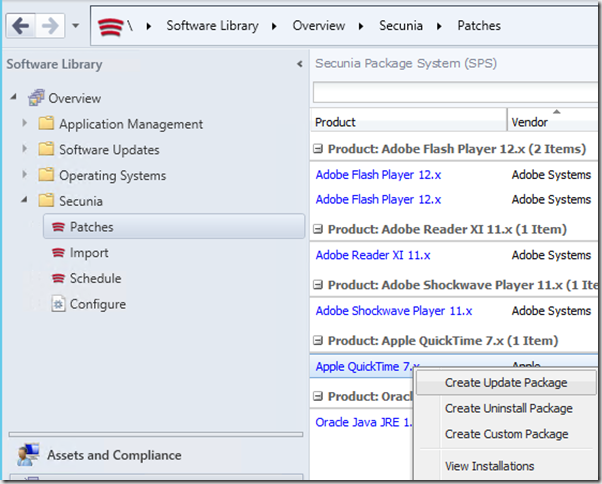
- In the ConfigMgr console, select the Software Library workspace and navigate to Secunia, Patches.
- From the list of available patches, right click the update and select Create Update Package.
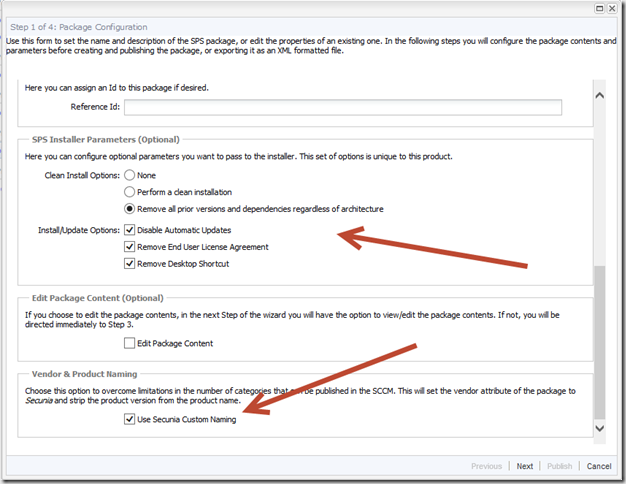
- This will launch the Package Creation wizard in where you can customize and publish the package. In this example I will perform a Remove all prior versions and dependencies, disable automatic updates, remove the EULA and remove the desktop shortcut. The options you can select are specific to each application (deploying a JAVA package will provide you with a long list of specific Java options). Another important lessons is to select Use Secunia Custom Naming. This setting will make your life easier (trust me) and list Secunia as the main product.
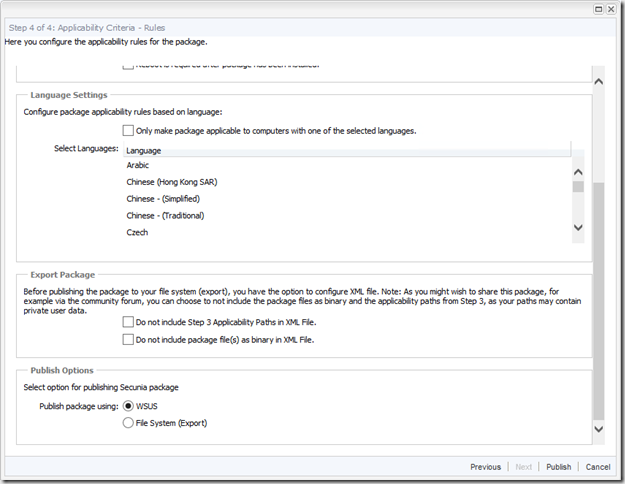
- Click Next twice, on step 4 notice that you are going to publish the package using WSUS.
- With the package published to WSUS, it’s time to configure a few things in ConfigMgr. Notice that you only have to do this once. The process is – synchronize ConfigMgr with WSUS, select Secunia as vendor hereafter the new package will be available alongside the “normal” Windows Updates.
- To synchronize ConfigMgr with WSUS, launch PowerShell from the console, type Sync-CMSoftwareUpdate -FullSync $false – you can monitor the synchronization process in wsussyncmgr.log on the primary site server.

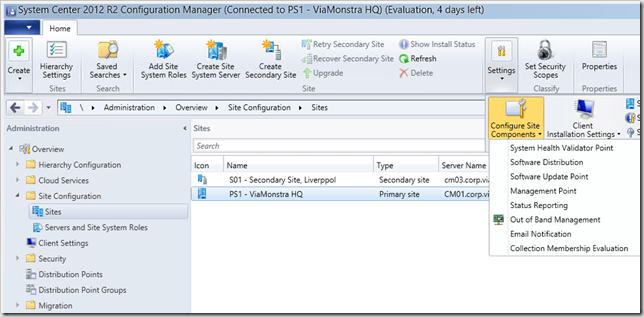
- After the first successful synchronization, open the ConfigMgr console. In the Administration workspace, select Site Configuration, Sites. From the ribbon click Settings and open the Software Update Point properties.
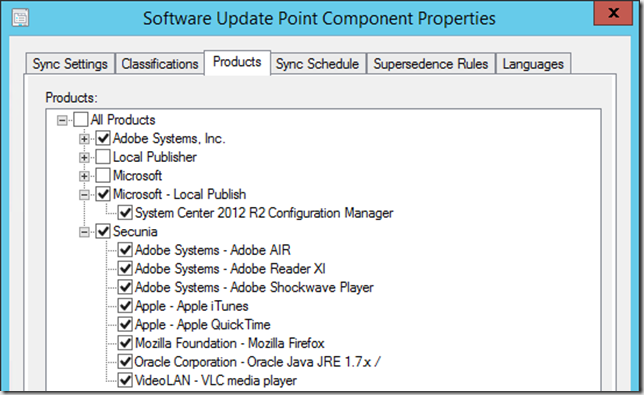
- On the Products tab, select Secunia as product and click OK. This configuration will ensure that all future WSUS synchronizations also include products from Secunia.
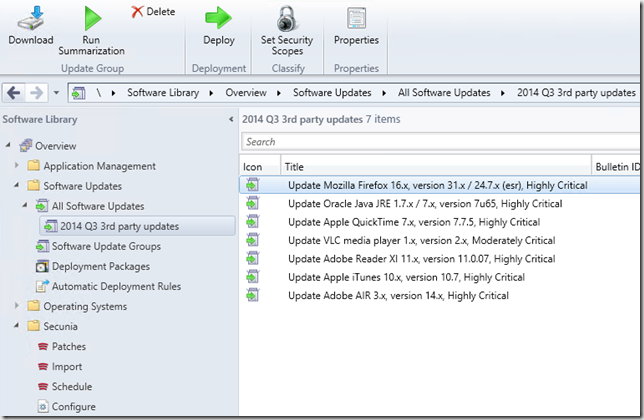
- From now on updates will become available in ConfigMgr alongside with “normal” Windows updates. The process of deploying and installing Windows updates and 3rd party updates is identical. For best practice I always create a specific software update package for my 3rd party updates and place them in specific software update groups. It makes it easier for me to track deployment issues and compliance within ConfigMgr.
- Below is the Software Update group containing some of the 3rd party updates.
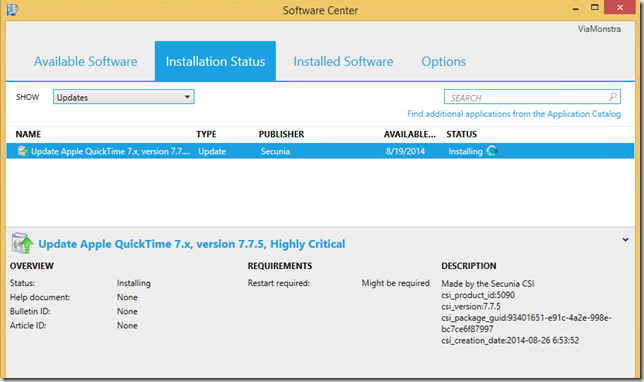
- On the client, the installation is similar to any other software update. In this example I have configured the installation process to be shown in Software Center
Update multiple versions to the latest secure version
Another example where you will find CSI very helpful is performing an upgrade of previous versions to the latest secure version. An example is Adobe Reader where organizations often have a mix of version 10 and 11 installed (I also still see version 6, 7,8, and 9 out there).
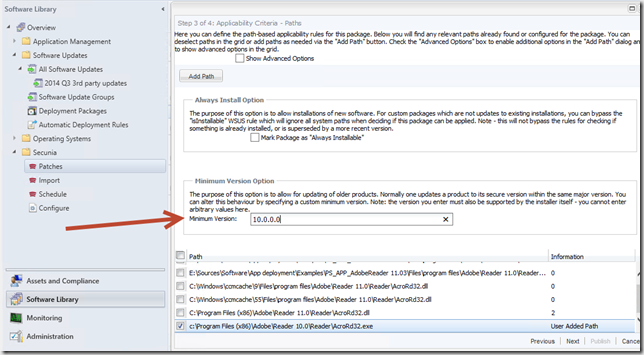
- The way to fix this is by adding the old Adobe Reader paths in the Secunia SPS package when you publish it to WSUS. This is done on the third step in the wizard. Click Add Path and add the Adobe Reader 10 path.
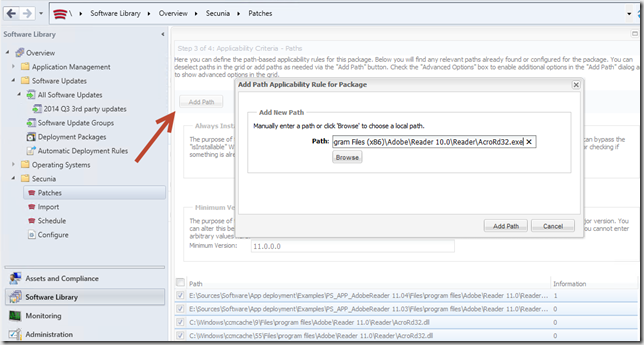
- Change the Minimum Version Option to version 10.0.0.0 and publish the update.
- That’s it, a little extra work and you can upgrade all previous versions with just one package.


Kent–nice writeup. How would you say Secunia compares to other (and more affordable) 3rd party update services such as Patch My PC?