A little over a year ago we released the first version of our Application E-mail approval utility. Ever since our first release we have received lots of positive feedback and ideas to new features. Most of the ideas are implemented in this new release. Thanks for all the feedback and please keep it coming.
This blog post will explain how you can install CTAA (Coretech Application Approval tool) – Download Additional blog posts will follow and explain how you can customize the tool.
Why the need for this utility
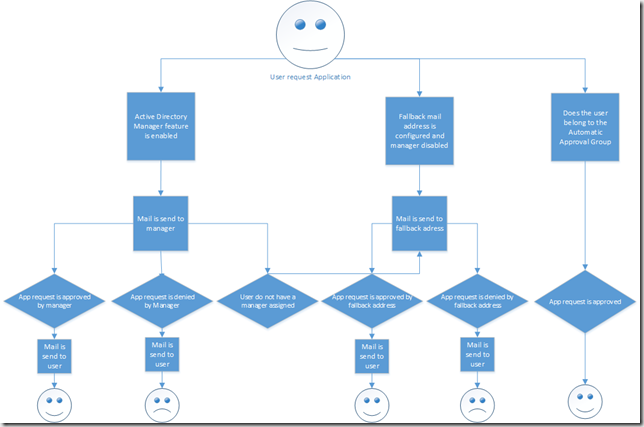
The idea with this utility is to integrate a “real approval flow” with the standard ConfigMgr 2012 application request feature. Out of the box, ConfigMgr requires that you approve all application requests in the ConfigMgr console. What many of our customers want is a flow where application requests are mailed to the business manager and/or a fallback mail address like servicedesk. Both of those features can be implemented if you have System Center Service Manager and System Center Orchestrator in place. If those products are not installed yet, the Coretech Application Approval tool can be used instead. The process flow is described below.
As you can see in the illustration a mail can be send to either the designated manager in Active Directory or to a fallback mail address like servicedesk. Users can also be added to a predefined security in Active Directory where approval requests are automatically approved.
The requirements
The solution is a website running on any of the servers in the same domain. In this example the website will be installed on the primary site server.
-
IIS
- IIS Application Pool
- ASP.Net 4.0
- Windows Authentication
-
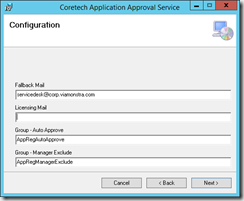
3 Active Directory Security groups
- AppReqWebsiteApprovers (users who can approve/deny all application requests. By default the manager can only approve/deny requests for users they manage). The managers and other users that can approve application requests must be a member of this group.
- AppReqManagerExclude (users where approval requests will always be forwarded to the fallback mail address and not to the manager)
- AppReqAutoApprove (users who will have applications requests automatically approved).
-
Mail addresses
- 1 mail address used as the sender for all mails.
- 1 mail address used as the fallback solution
- 1 licensing mail address (optional), used to send a mail informing that a license is about to be used.
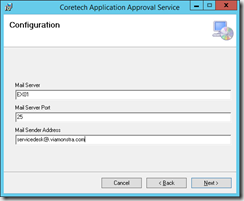
- Information about the SMTP server and port.
The installation process
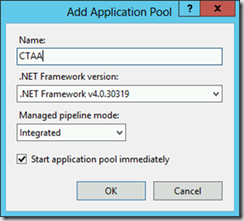
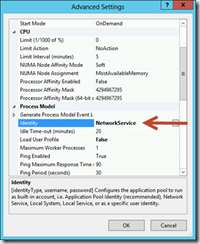
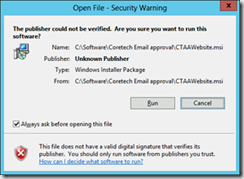
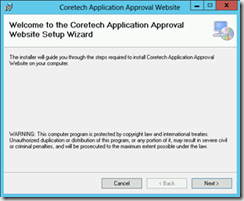
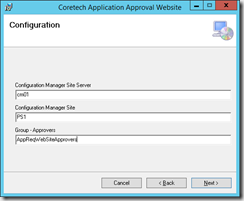
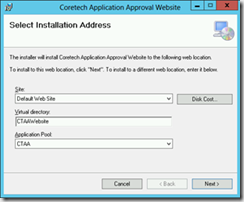
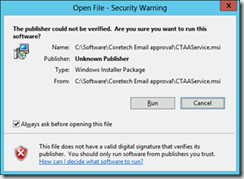
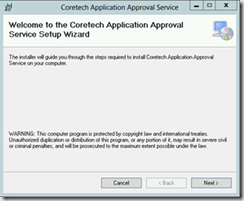
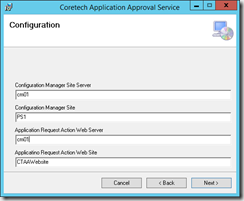
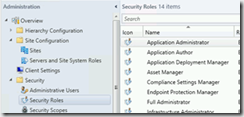
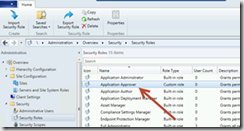
The installation process consist of a website and a web service. During the installation you’ll be prompted for information about mail addresses, security groups and SMTP server. In the example below you start by creating a new application pool in IIS, install the CTAA website, install the CTAA service and finally import a customer user role in ConfigMgr. The user role is mapped to the AppReqWebsiteApprovers Active Directory group.
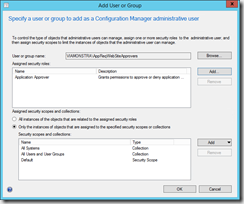
Select Administrative Users, Add User or Group.Add the group, AppReqWebsiteApprovers, assign the group the Application Approver security role and click OK.
Testing the Application Approval tool
- Create a new user target deployment, the deployment must be Available and you need to ensure you ask for Approval.
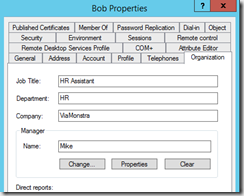
- Ensure that your test user either has a manager in Active Directory otherwise the request will be mailed to the fallback e-mail address.
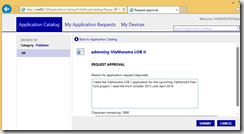
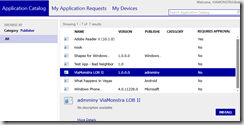
- Log on to the Application Catalog and request an application
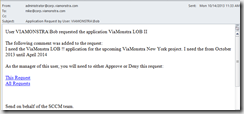
- In this example Mike is the manager and will receive a mail informing that Bob “the user” has requested an application.
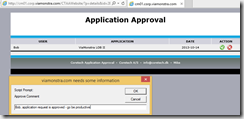
- Mike will be taken to the Appliation Request website from where he can approve or deny the application requst.
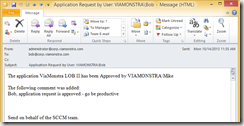
- Bob will receive a mail with the approval information and can start installating the application.
Kudos for this project goes to Claus Codam, who has been the main developer.



First, thanks Kent, and especially Claus, this fills a gaping whole that I still can’t understand why Microsoft has left this out, other than to push you towards installing yet another product that for ?many? would otherwise not be required.
My question is this. This indeed is an outstanding way to solve the initial application request and it’s approval, but what I do additionally is when a request is made and approved, I also add that user to a collection that has that specific application published (required) to them. This way, it’s future proof as well, since it will install on future machines as soon as they are the primary user on them, and the user does not have to re-request it, or install it manually themselves. This works for new versions as well, I create a new version, publish it to the same collection (already populated with the users that have previously requested the software) and bing bong, done. I know if you supersede the old software it is supposed to replace it automatically if setup this way, but I find this less than reliable depending on the specific application.
Just curious if I’m missing something and over-complicating it…or if this is not how most people would want it to work anyway…
I would love to just have this automated with email, but I want to retain user’s being assigned to the software they ask for through any future devices they might migrate to. End goal, user makes an application request once, never again and it installs automatically on any new hardware after they become primary user.
Thanks guys, this is a greatly needed tool, and while it partially helps me, hopefully it will fully meet most admins needs.
Don
Been almost a year, and still no reply…makes me think I’m the only one doing it this way? What am I missing? Anyone?
Hi Don,
Applications, that needs approval, are usually licensed application, that have some sort of cost to the company. If you add the user to a collection that have a required deployment of the application, you will install this application on all the users current primary devices, which might only be one, but could be several, and all future primary devices.
The user might not need the application on all of his/her devices, and might not need it in the future. In this way you will end up paying a higher license cost for the application, than were perhaps needed.
That said, I can see where you’re coming from, and it might not be a problem in your case. The reason we haven’t just implemented the feature as a possibility, is that it isn’t just a simple addition. We would either have to create a whole array of our own collection with the application deployed required to them, or count on collections already created, with some sort of naming standards. It will leave people with either a lot of new collections to manage, or a lot of renaming to do, away from their own naming standards.
If you still need this functionality, please contact us, and we will be more than happy to help you accomplish this, even through an update to the tool specifically targeted to you, or a separate service to handle it.
Thank you.
Hi,
how do I set that the email will always be sent to the fallback address and never to the manager?
BR
Dan
Dan – I just wrote an example in this blog post – http://blog.coretech.dk/kea/configure-coretech-application-e-mail-approval-tool-to-always-use-the-fallback-mail/
Cool, thank you very much! Awesome tool, have been waiting for this updated version ever since the first one was released.
[…] http://blog.coretech.dk/kea/coretech-application-e-mail-approval-tool/ […]
Hi Coretech, Great tool…just one issue im having…after requesting the application using app portal and getting the email….when clicking on the email to approve request..it goes to the CTTAwebsite, but it will not show pending requests that need approval…..its shows empty page with heading only….anything else i need to do….
Also getting the same unless I add the manager to the group AppReqWebsiteApprovers, do all managers need to be added to this group to approve?
Hi Sunny and Russo,
The user accessing the website, will need to have rights in ConfigMgr. You can use the AppReqWebsiteApprovers AD Group created for this purpose, or assign equal or more rights to the user through the ConfigMgr console.
The user will need these rights, because we use his credentials to Approve/Deny the Application Request. We use his credentials, so that we later can look at an application request, and determine who approved/denied it.
I’ll look into providing a PowerShell script, that will automatically add all managers to the AppReqWebsiteApprovers AD Group, for your convenience. I guess this could also be implemented into the service as an option.
Alternatively, you can take a look at the Application Approver security role in ConfigMgr, and determine the security risks it would pose, if you decided to assign it to the Domain Users AD group, or some other wide-spanning AD group. Although I would highly recommend AGAINST it, as it would give all the users of the group rights to approve/deny any request, through WMI and/or the ConfigMgr Console. You would of cause still be able to see which user approved/denied the request, and then give them the pink slip, if they decide to do so.
Hi Claus,
All rights were configured in the Configmgr, but still no luck…its not showing any requests on the CTTA website when trying to approve/deny..its only showing the headings.
Could this be a issue due to workstations and servers being on different domains.
We have not tested this tool in a multi-domain environment, so it is entirely possible that it will break the solution.
Under the Website Folder, in the Web.config file, you can change the Debug parameter to True, and get a bunch of information when accessing the website. One of the information will be a list of groups the website has associated the user with.
If you want to have a debug session, you’re welcome to contact me: CCO AT coretech DOT dk
Thanks.
I had to add the site to compatibility view in IE 11 then I was able to see the requests.
Hi Claus/Kent,
Does the CTAA Website and CTAA service need to be installed on a configuration manager server? Currently, I have it installed the CTAA website and CTAA service on a non configuration manager server and it does not seem to work.
Thanks,
Mike
Hi Mike,
Security and Permission wise it’s much easier to install directly on the Configuration Manager server.
If you install it on a separate server, you will need to make sure that all the needed IIS components are installed.
You will also need to run the Application Pool and the Service under credentials, which has both Configuration Manager and Active Directory Read permissions.
Hi Claus,
We like to keep Configuration Manager tools on a separate server. We have CM 2012 Client Center running on the same web server as well. The separate web server has the same IIS components installed as the configuration manager server. The user gets the error Handle Exception. Error:Access is denied. (Exception from HRESULT: 0x80070005 (E_ACCESSDENIED))when launching the Application Approval CTAA web page.
Thanks.
Mike
I am getting the same thing. We created a VM and installed as per the directions. No email being sent either. Any ideas?
We are also getting this error. Just migrated from an ealier version to this new one, because of the fallback mail functionality.
Installed all as recommend like the screenshots. But no e-mail is being sent, also the website is not available on any other computer as the server from which it is being hosted.
Before the updgrade it was working great!!
Be glad to get some help getting this fixed.
got so close to getting it to work off of a VM
get the email, but get this when I try to look at the request Handle Exception. Error:Access is denied. (Exception from HRESULT: 0x80070005 (E_ACCESSDENIED))
on the server or on a workstation.
Anybody figure out the issue with the “Handle Exception. Error: Access is denied.” when trying to click to access the website to approved or deny. We can access it when we are on the server directly. Please help.
Thank-you so much for this tool! This is a vast improvement from the approval process that comes out of the box.
I am having issues where the tequest emails come through without the logo/image at the bottom. How would I check the value of ‘%IMAGE1%’ so I can ensure the image is shown rather than the Red ‘X’ of death…
Thanks!
Trent
Trent do you still need a answer for this?
It’s probably something simple but what is the answer to this? I just removed the image placeholder from the htm template.
David,
That’s what I ended up doing as well. I tried to change the code but I wasn’t able to get any image to properly display. I’d love to see this be a customizable field (or if it is perhaps someone could help point me in the right direction).
Thanks!
Trent
For those having issues with the image 1…
I have 2 work arounds until a solution is posted…
1) <img src="http://yourwebaddress.com/image.jpg". Users may need to click a button to display images.
2) <img alt="" src="data:image/gif;base64 (Paste your Base64 Code here.) There are free sites for converting images to base64.
The tool is awesome, but like the others I’m not comfortable installing it directly on a SCCM Server.
A walkthrough on getting the tool to work on a non SCCM server would be great and much needed.
Hi Guys,
Will Start off with this is a fantastic tool, just installed it on our Prod SCCM without issues, so easy to set up, and loved by the Licencing Guys. Just wondering if there is a way we can change the Subject line in the emails that get sent out to user the Displayname for the user rather then the logon name?
Cheers
Steve
[…] intelligence 3rd party software utility Coretech application e-mail approval tool Coretech shutdown tool Coretech Package Source Changer Right click Tools SCCM 2012 Toolkit MDT […]
[…] Coretech Application e-mail approval: http://blog.coretech.dk/kea/coretech-application-e-mail-approval-tool/ […]
[…] Coretech Application e-mail approval: http://blog.coretech.dk/kea/coretech-application-e-mail-approval-tool/ […]
Hi,
I had a question as to how would this behave if installed on to primary servers on the same domain?
We have 2 primary sites one in Australia and on in the States which have separate application catalogs. At the moment one site is configured with the coretech tool and sends notifications for both sites. We are trying to work out a way to separate them.
Hi Matthew,
The service connects to a primary site through WMI \serverrootsmssite_xxx – therefore it should only see Application Request for that site.
I’ve send you e-mail if you want me to investigate further.
Can the “mailFrom” be configured to send from the user who requested the app?
Hi skyhwak,
That is not possible in the current version.
If this is a requirement for you, we will be more than happy to work with you to implement it.
Please! that would be last requirement to make this perfect.
Hi, we are too interested on having the requester as the sender of the email. this is because we are using the fallback option to send email to our helpdesk system. if the requester is the sender then this should be automatically log by the software requester. can you please advise if this is possible?
Can the “mailFrom” be configured to send from the user who requested the app.. if this can be done it would be amazing! thanks again!
Reply
Anybody figure out the issue with the “Handle Exception. Error: Access is denied.” when trying to click to access the website to approved or deny. We can access it when we are on the server directly. Please help.
Hi Claus, I also like to find out how mailFrom can be customised from the request user ? thanks
Hi,
Does this support with ConfigMGR 2012 R2 as well?
Willi
It appears the “Handle Exception. Error: Access is denied.” occurs accessing the website when NOT installed on the ConfigMgr server because credentials are not being passed in the DCE/PRC call to the ConfigMgr server:
155 17.727271000 Webserver ConfigMgr DCERPC 207 AUTH3: call_id: 3, Fragment: Single, NTLMSSP_AUTH, User:
156 17.727358000 Webserver ConfigMgr ISystemActivator 894 RemoteCreateInstance request
158 17.727961000 ConfigMgr Webserver DCERPC 86 Fault: call_id: 3, Fragment: Single, Ctx: 1, status: nca_s_fault_access_denied
Status: nca_s_fault_access_denied (0x00000005) (Wireshark Expert Info in packet 158)
Packets were captured, via Wireshark.
Hi, I have the same setup. Did you find a solution other than moving the website?
Thanks!
Look at http://blogs.msdn.com/b/jiangyue/archive/2011/02/11/case-study-debug-distributed-application-using-packet-analyzer.aspx … section “The Debugging”.
Although not exactly the same, it appears to show why it’s failing.
Look at “http://blogs.msdn.com/b/jiangyue/archive/2011/02/11/case-study-debug-distributed-application-using-packet-analyzer.aspx”, section “The Debugging”.
I believe this explains why it’s failing with “Handle Exception Error; Access is denied”.
Look at “http://blogs.msdn.com/b/jiangyue/archive/2011/02/11/case-study-debug-distributed-application-using-packet-analyzer.aspx”, section “The Debugging”.
I believe this explains the “Handle Exception. Error: Access is denied” error.
Sorry about the redundant posts … cause of “loose nut on the keyboard”.
Sorry about the redundant posts … case of loose nut on the keyboard
Also, I forgot to mention that the AppPool and service are configured with userids that both read access to ConfigMgr and AD.
Sorry about the redundant posts … case of loose nut on the keyboard
Also, forgot to mention the AppPool and service are configured with a userid which read access to ConfigMgr and Active Directory.
after configure the tool the, we are getting the request email and etc. also when we click the option in email it re-directs to the CTAA website and open the web portal and shows the application requests. However the “APPROVE” or “DENY” tabs not functions as it has to. Any one faced the same issue? any idea why the when we press either options no further action happens. basically when we click approve or deny there needs to open another windows to put our comments. but it not happens!!!!.
Having the same problem, even tried different browsers, turned off pop-up blocker… have no idea why it’s not working. Did you ever happen to get replied to with a fix for this?
Any update, e.g. fix or new release?
I followed your publication and I receive the mail “application request by User:” but when I click on “this request”, the navigator ask for user and password and then I get “Unable to login”
Hatem,
How did you install?
For example, on your SCCM box or another server?
If another server, can you detail your installation.
Thank you in advance for your reply.
I installed it on SCCM server, exactly like yours
Hatem, did you get this sorted out? I got the same issue now for one of our customers. Same settings for our other customer which it is working
[…] http://blog.coretech.dk/kea/coretech-application-e-mail-approval-tool/ […]
[…] Coretek Application Email Approval Tool […]
This is a great utility that saves us from using Service Manager!
There is just one feature that I wonder if could be added:
Would it be possible to have a list that links applications to approver for that application, and to have requests checked against that list before checking the manager of the user, so that we can have assigned approvers for some applications?
Ziggy,
It appears you’ve had success … how did you install, on your SCCM box or another server?
If another server, how did you install?
Thank you in advance for your reply.
I installed on same server. Didn’t have any problems except forgetting to log off and on my machine after adding myself to the AppReqSiteApprovers, so that when I clicked the links in the mails I received I got to the webpage with no waiting requests… I’m on SCCM 2012 R2.
Ziggy,
Thank you.
I’m on SCCM 2012 R2, but trying to use from another server.
Did you follow Coretech’s install instructions exactly or did you have to make any adjustments?
I think I followed them exactly. Tried to, anyhow.
I second Steven’s request of 20th Nov about being able to show displayname instead of username in the mails.
Also, I notice that the Requests and History tags om the webpage doesn’t do anything except adding a # to the URL.
Hi,
I have installed this on the CongigMgr Primary server. however when I try to browse the CTAAWebsite portal it give an error as follows.
Handle Exception.Error:The given key was not present in the dictionary.
any idea what to do ??
Thanks
willi
We got an issue we are unable to solve ourself. When a mail is sent to the fallback point, when that person enters the homepage from the link in the e-mail, there is nothing to either approve nor deny. The person in the AD-group for approval. If the person is set as manager in AD though, it works fine.
Anyone with an idea how to solve this matter?
Does anyone think Coretech ever reads these comments and/or even cares?
I noticed that the approval email is sent when the software request is a new request. But when a user requests a software when there is already an active request from that user for that software, no email is sent. SCCM updates the request with the new time and new comments. But this tool does not send a new email. I had to use the Cancel option on the ‘My Applications Request’ tab before requesting the software again in order to get a new email.
Hi, we are too interested on having the requester as the sender of the email. this is because we are using the fallback option to send email to our helpdesk system. if the requester is the sender then this should be automatically log by the software requester. can you please advise if this is possible?
Can the “mailFrom” be configured to send from the user who requested the app.. if this can be done it would be amazing! thanks again!
Reply
Hi, we are too interested on having the requester as the sender of the email. this is because we are using the fallback option to send email to our helpdesk system. if the requester is the sender then this should be automatically log by the software requester. can you please advise if this is possible?
Can the “mailFrom” be configured to send from the user who requested the app.. if this can be done it would be amazing! thanks again!
Hi Coretech,
Is it possible for you guys to put up a step-guide how to install this in a multiple domain environment (having server(s) in a separate domain and clients in another)?
It would help ALOT. Tnx.
Correction: having server(s) in a separate domain and clients/users in another
Tnx.
If Coretech isn’t going to respond to questions, then they shouldn’t have let this program be advertised and prompted at TechED 2014!
Dear Greg,
We didn’t present this tool @TechEd – I know it was mentioned in a community session but it wasn’t a Coretech session. The tool is a free tool (we spend weeks developing it), and we do our best to assist all of you. We do look thru all the request and feedback and are also considering releasing an updated version of the tool. Thanks for using it
Hi Kent,
Thank you for releasing this tool! Would you happen to have a date for the updated release? Cheers.
[…] Coretech Application e-mail approval http://blog.coretech.dk/kea/coretech-application-e-mail-approval-tool/ […]
Hmm is anyone else encountering problems with the images
on this blog loading? I’m trying to figure out if its a problem
on my end or if it’s the blog. Any responses would be
greatly appreciated.
after configure the tool the, we are getting the request email and etc. also when we click the option in email it re-directs to the CTAA website and open the web portal and shows the application requests. However the “APPROVE” or “DENY” tabs not functions as it has to. Any one faced the same issue? any idea why the when we press either options no further action happens. basically when we click approve or deny there needs to open another windows to put our comments. but it not happens!!!!.
I am having the same issue, were you able to resolve this?
I am having the same issue, approve and deny buttons do not work. Were you able to resolve this?
Were you able to figure out how to fix this?
Me too … thx this …plz
[…] solution, available here: http://blog.coretech.dk/kea/coretech-application-e-mail-approval-tool/, is typically installed directly on a primary site server and has not been seen to cause any […]
Hi, great tool… But the History function does not work.
It only sets a # on the website adress. Is this something you are working on?
Hello,
We have an issue with emails not been received. We can see the requests and action these on the CTAA Website but the Email notifications never arrive.
How can we troubleshot this? Is there any debug logs created that we can investigate.
thanks
Hi paul.
We got the exact same problem now, it were working previously, but for some reason it is not working anymore and cant figure out why.
Let me know if you find a solution please, and I will do the same
I am also having the same problem with the email not consistently being sent. Everything works, the request populates on th CTAA website just fine. But email notification has been inconsistent. If I reboot the server then email notification starts working again… but only for a little while.
Hi There
We have this all setup and working well – however we would like to be able to approvedeny the requests just from the email rather than being re-directed to the website.
Similar to the emails in the older version?
Can this be done?
Thanks
I’ve seen it posted a few times but never answered. Has anyone been able to get this tool to work with the SCCM server in one domain and the users in another?
Hi Kent,
I have successfully installed your tool and it seem to work. But I have a problem with E-Mail. I have from my exchange server a manager in the AD. Now if I request a APP my manager received the E-mail. It should not be and I want to change that, but I dont may to change the manager in the AD. How can I change that I can receive the e-mail and not my manager?
Best regards
Nick
[…] Update 3: Coretech provides a tool to do this and it seems to be free. have a look if you need the functionality and miss the components: http://blog.coretech.dk/kea/coretech-application-e-mail-approval-tool/ […]
Trying to install on the SCCM server, but with a different website to the Default. Is there anything I need to configure, as I’m getting:
“Error 1001. Object reference not set to an instance of an object”
I am also getting this:
Trying to install on the SCCM server, but with a different website to the Default. Is there anything I need to configure, as I’m getting:
“Error 1001. Object reference not set to an instance of an object”
We too had issues with the “E_ACCESSDENIED” error on a separate server. Installed on the Site-server and everything worked.
It would be awsome if this were made for multitendant AD..
The problem is that if you remove part of the URL, you can see all the requests no matter who sendt it..
In our environment that is a issue.. :/
Anyone got a solution to the “unable to login” issue?
The persons are in the ad-group to approve requests, and the group is added to SCCM.
How ever, when the e-mail is received and they click on the link to approve requests and enter their credentials the page does not show any requests and “unable to login” is shown in the top left corner.
Can’t seem to figure out myself what is causing this. Any suggestions from anyone?
Hi,
I am receiving this error on the Application Approval WebPage:
“Handle Exception. Error:Invalid namespace”
Hi
Since few weeks we have the problem, that no more emails will be sent to the approver for new requests.
When the request is approved, the requester don’t get an email too.
Anyone an idea, how to troubleshoot this?
thanks
Hi Coretech Team!
Since a few days we started to receive the following warning/error on the main site of the application approval webpage:
“Handle Exception. Error:The given key was not present in the dictionary.” or “Handle Exception. Error:Access denied”
The site doesn’t show any requests, but loads background, graphics and tables.
In other hand, we can directly access to requests (by it’s ID, for example: SofreStore_AP/?p=details&id=573F530B-2FA5-41CD-9E42-A8F06DF7DC1A).
We checked web.config, permissions, AD groups, etc, but we didn’t find any solution so far.
Any ideas?
Thanks in advance!
Did you ever find a solution to this, I’m having the same issue.
Hi!
Nevermind my last comment. I’ve found the solution:
We deleted a program package from the Application Catalog that has a pending approval request.
Then, we denied that request on SCCM console and the Approval Site started to work fine again.
I hope it helps another people!
HI!
Unable to Login
ctaawebsite/
Any suggestions from anyone?
Had the same problem.
Delete CTAAWebsite in IIS Default Web Site.
Delete CTAA in IIS Application Pools
Remove CTAAService and CTAAWebService
Reinstall and it works again.
Hi Coretech,
This application approval workflow is a great tool. I was using a ps1 script process before but if you forgot to launch it you did not get a notification.
I deployed the latest version, and can get to the approval page however I receive the ApproveHandleException or DenyHandleException errors when running this. My server is WS 2012 R2 with SCCM 2012 R2 CU3.
Due to our security and naming convention I prefixed the group names with “SG SCCM “. Hopefully this is a simple fix, and any help is appreciated
Is this a free tool?
I am also testing the tool and i think it is great!
I have found 1 thing that doesn’t work, when a manager is blocked, the manager still gets the approval email instead of the Fallback adress.
The other features are working great when u give the necessary permissions.
For the people with non working portal buttons, just use comaptability view
For the People with problems regarding e-mails which are not being sent, the solution is to manually start the CTAAService (displayname: Coretech CM Application Request Listener).
When you do that, the mail functionality will work fine again.
An improvement which also could be made is that only the manager which receives the email can approve/deny the request, at this moment all managers which are in the group with permissions to allow requests can view and allow/deny all requests.
Hi Friends,
Can anybody put some light about the licence of this tool.
It looks like a free one can anybody help me with a confirmation?
Thanks in Advance
KITT
Hi,
I have a wierd issue the “approve” or “deny” buttons don’t work. It looks like a link attached to them. Not sure how to fix that. Some help would be very appreciated.
I even tried reinstalling the whole thing but did not help.
Thanks in Advance
—
KIT
Hi there
When i install the CTAAWebsite.msi i seem to be missing the box “Group – Approvers”
any ideas why?
Please ignore my last comment….it was a corrupted .msi
all good now
Cheers!
D.
I am getting the following error when trying to install the website MSI:
The specified path ‘/LM/W3SVC/1/ROOT/CTAAWebsite’ is unavailable. The Internet Information Server might not be running or the path exists and is redirected to another machine. Please check the status of this virtual directory in the Internet Services Manager.
Even though it appears the MSI is supposed to create the site I tried manually creating it first but got the same result.
Cannot find the xml file in the zip file ?
Wonderfull Tool, thanks a lot for creating this.
The website Works, just only on the webserver itself.
On all other machines i get the “Handle Exception. Error:Access is denied. (Exception from HRESULT: 0x80070005 (E_ACCESSDENIED))”
Any ideas?
Did you ever resolve the Handle Exception. Error:Access is denied. (Exception from HRESULT: 0x80070005 (E_ACCESSDENIED))” issue. I am having the same problem.
Did you ever find a solution to this, I’m having the same issue.
What is the license model for this? Can I modify the source and add a few new features?
Thanks for the tool, I’ve been using it for a long time now with great success.
Quick question……does anyone know if this works with ConfigMgr 2012 R2 SP1, as I’m looking to upgrade my Prod environment in the near future?
Cheers !
Hello
I’m running on server 2012 R2 & SCCM 2012 R2 SP1.
The application runs on IIS 8.5.9600, under .NET CRL Version v4.0.30319.
Did a setup by instructions and the site is up and permissions are there.
Though when I open up a site from whatever the web browser I can only view content, none of the approve, deny or other buttons work.
Tried IE8, IE11 & compatibility modes.
I have seen others before having the same issue, is there a fix or it?
From debugger I see
$(“.body li ul”).click(function () {
$(this).find(‘ul’).slideToggle(300);
});
var aAsc = [];
The value of the property ‘$’ is null or undefined, not a Function object.
Line 57.
As usual, when you write a post you find an answer..
In my case I was running all the stuff in LAB env without access to internet.
As the site uses jQuery src from http://code.jquery.com it needs to ?? Yes, access it..
Added external network and everything works like a charm even with the latest greatest installations of server OS & SCCM.
Is there a way to have the tool send an email when an application that is “not” required to be requested is initiated for an install?
In my case we want it to send an email to our helpdesk application that will automatically open a ticket and close it.
Hi Kent,
I have installed and am testing the approval tool in our environment and am also seeing the issue mentioned earlier in the comments that the email address I have configured receives application requests from other primary sites connected to the CAS. We have a global CAS site and then regional Primaries. I am trying to test this at a Primary site level and moving forward we need to be able to forward approval requests to different teams depending on the Primary Site the users belong too.
Is there a way to ensure only requests made from the Primary Site which is running the tool will get processed?
Thanks in advance
Nathan
It’s funny how everyone seems to be duplicating effort trying to solve the same issues, albeit with slightly different requirements.
We recently implemented a similar solution, but with multiple approval levels (large environment), different approver addresses depending on location (based on OU), retention of all request history (for aged/deleted requests), reminders in case nobody actions a request in a timely manner, etc. Our solution consists of a SQL database (sending emails using DB Mail) and an ASP console.
Hi
I am having the same issue as Nathan using the approval tool in a CAS – Primary, multi domain environment.
Just wondered if the problem could easily be addressed by adding a user domain setting to the Web.config.
Given that the “User” property in the database includes both the user domain and the user name of the requesting user, it should be an easy fix for the CTAA service to filter out application requests where the user domain setting and the user domain do not match.
Say adding “User LIKE ‘\%'” to the existing WQL query…?
As I am, obviously..:), looking for a quick solution to my problem, I am of cause willing to test out a new .DLL.
Thanks in advance
Rico
Hi,
We have just upgraded to SCCM 2012 1511, and now the Approval system no longer works. I’m just looking into this now, but if anyone has a fix for this it would be greatly appreciated!
Thanks.
Just to clarify, the CTAA website is still fully functional, but the e-mails are no longer being sent. Looks as though the Coretech request listener service is no longer detecting requests in SCCM 2012-1511.
Martin
Please ignore – I’ve resolved this now. It was due to my customisation, this is all working with the 1511 upgrade. Sorry!
Hi Martin,
Can you remember what part of your customization was causing the emails to not be sent? I have the same situation as you did.
Cheers, Mike
Such a good app Kent, thank you.
I do have trouble with users from forest trust domains being able to use the tool (to approve). Whenever they access the CTAAWebsite they receive the following:
Unable to retrieve groups, that the user: XXXXXXX is a member ofObject reference not set to an instance of an object.DC=XXXX,DC=XXXX,DC=XXXX
So reading the groups associated with users form other domains is causing this error. Is this something that a change in the way rights are allocated can remedy, or is this something fundamental in the way the tool works that allocation of rights to approve cannot be given?
Regards
Jamie
Hi Jamie, did you find a solution to your problem? We have the same issue.
Thanks,
Chris
Hello,
i would like to thank you for this great tool!
I have it installed and the Website and approval/deny process works perfect.
I have created the AD groups as also the manager is selected in AD for my test user.
But i did not get any email. I’m able to connect to the SMTP server via telnet from the Webserver. But this tool doesn’t send any emails.
Do you have any ideas why and where can i search for logging?
Best regards
Volker
Hi Volker,
You should be able to see the log via the Application Event log.
Let me know if it works for you.
Best Regards,
Casper
Hello Casper,
thanks for the fast response!
I tried this now. Submit a request. It is listed on the CTAA Webiste.
But got no email.
There is nothing in the Windows Application Event Log.
I restartet also the service. Only Entries from Coretech CM Application regarding the restart.
But no other message.
Any ideas?
How often do the service check for new request and try to send out the email?
Thank you so much!
best regards
Volker
Hi Volker,
Can you try to modify the variable debug in the .config file for the tool? Set the variable “debug” to true. This should give more data to the application event log. Remember to restart the tool after this.
If there’s no error in the event log, then the mail should have been sent out, have you checked it’s not in the junk folder? Another posibility is there’s no manager set for the user, and therefor the mail was sent to the fallback.
Hope this helps,
Casper
Hello Casper,
thank you!
I have changed the value for Debug to True and also restart the server completly.
Nothing more in application event log. Only that the service is restartet.
I request for a new software. I’m able to see the request on the website but not received an email.
The Manager is also set in AD.
No idea
Thanks for any idea on this!
best regards
Volker
I have the feeling the service does’t try to send an email.
When i enter a MaiLServer IP which is totaly wrong i got nothing in the application event log.
No error message. Debug = true
It works now!
Seems it was an issue with the account where the service is running.
By default it was running under network service, i changed it to a domain user and it send now the email!
Great!
Only isuee the website is not accessable from remote. I got an access denied from the IIS.
When i’m on the server it works.
Thank you!
Hello Casper,
thank you!
I have changed the value for Debug to True and also restart the server completly.
Nothing more in application event log. Only that the service is restartet.
I request for a new software. I’m able to see the request on the website but not received an email.
The Manager is also set in AD.
No idea
Thanks for any idea on this!
best regards
Volker
Hey Volker,
Glad to hear that it’s working now
Best regards,
Casper
I too am having issues with the primary site server being in one domain and my users being in other (3) domains. I receive the same error as others, Unable to retreive groups, that the user: xxxxxx is a member ofObject reference not set to an instance of an object.DC=xxxx,DC=com
Has anyone been able to fix this? Thanks in advance.
Hi Jon,
I have this same problem. This is frustrating, wish there was a workaround.
Hi;
Thanks for the tool. I have issue about tool. I received all mail(Fail back, manager…) except Approve/Deny mail. I create “AppReqWebsiteApprovers” security/global group and add two person to members but nobody didn’t receive mail. My domain is like test.local but my smtp relay server domain testinfo.local. I create Application Pool with identity is NetworkService. What is the issue?
We’re a big fan of this tool, and have been using it for years. We’re in the process of migrating to SCCM CB 1511 and Server 2016 TP5. I get an error message when trying to install; it looks like the installer is detecting the Windows version as Windows 2000.
“This setup requires Internet Information Server 5.1 or higher and Windows XP or higher. This setup cannot be installed on Windows 2000. Please install Internet Information Server or a newer operating System and run this setup again.”
Just to confirm, IIS is installed. I will try again when Server 2016 is RTM.
Workaround is to create the website manually. The service was able to be installed, and the whole process works as expected.
We are trying to install the tool on a separate 2012R2 server from SCCM. It appears to work from the server, however when we attempt to access from another computer we are receiving the following error: Handle Exception. Error:Access is denied. (Exception from HRESULT: 0x80070005 (E_ACCESSDENIED)).
Does anyone have a solution for this?>
Very impressive work !!!!
Just a small Query,
> In our organisation , User send request to service desk by sending one email to servicedesk@dk.com and it will create ticket automatically and user get mail with ticket number so user can trace his ticket status.
> So now my query is as per below ,
when user request for application from sccm application catalog then this tool send mail to servicedesk@dk.com which i have set in tool but using different Email-ID not from user’s Email-ID so in this case user will not get any automatic email with ticket number and user can not trace his ticket where it stuck incase manager forgot to approve or it automatically deny which send mail to fallback email address not to user so it is very difficult for user to trace his ticket.
I know this tool is very useful for IT administration work flow but How can we make this tool useful for end-user as well like below,
> when different users request application then how can we set fall back email to different users individually with status of request.
Can multiple email addresses be entered in the FallbackMail and LicenseMail values section in the CM_AppReqListen.exe.config file?
Hey Guys –
Thanks for a great app! Unfortunately, it isn’t working for me 100%. When going to the hosted website, I get the below error at the top of the webpage at the very top in red: “Handled Exception. Error:The RPC server is unavailable. (Exception from HRESULT: 0x800706BA)” Nothing else on the website works. Emails are sending, though.
I looked through CM_AppReqListen.exe.config and saw that I had a comma instead of a period in one of my FQDN Addresses. I changed the config file, restarted the Coretech service and default website; but still get the error. I installed the Coretech apps directly on the 2012 R2 SP1 CU4 Primary server which is on Windows 2012 R2. During installation, I used all default / suggested values when possible including a dedicated Application Pool.
Any suggestions? Thanks!
Hello everyone, it’s my first go to see at this site, and
paragraph is genuinely fruitful designed for me,
keep up posting such content.
Works when installed on a CAS too. Works on SCCM 1610.
Hello Coretech,
I am trying to install CTAAWebsite.msi on our sccm server, which is running Windows Server 2016. Unfortunately, I get the following error message:
“This setup requires Internet Information Server 5.1 or higher and Windows XP or higher. This setup cannot be installed on Windows 2000. Please install Internet information Server or a newer operating system and run this setup Again.”
Our IIS version is above 5.1. Is there a workaround to solve this?
Solved it
I made a mst file that excluded the IIS version lockup.
I have the same issue. Could you please help me with the MST file>
Hello Coretech.
Excellent Work.
I install the application on sccm 1610.
I have a minor issue and i need your help.
my site server is on one domain but the users who request an application are not on the same domain.
On which domain the application ldap the active directory to find the manager of the requested user ?
Thanks
same problem also for the approval Manager.
Managers are on the same domain with users.
So the need is to change the domain of the ldap query for requested users (so it find the ussers and gets the manager)and also to be able to apply Active directory group for the managers who will approve the requests.
Thanks
Where can I find the .zip to install this plugin? I found one install, but it does not have the .xml file for the Security Role import.
Hello, first of all congratulations for the tool. I wonder if I can use this tool in my trading company or if you have any restrictions, license agreement or anything?
Thank you!
Hi, i get
“Failed to retrieve all current Application Requests.
Error: The RPC server is unavailable. (Exception from HRESULT: 0x800706BA)”
in the event log against coretech service every time i start the sevice, and email is not sent
any ideas where im going wrong?
thanks
the app is installed on the site server itself so shouldn’t have issues connecting
Did anyone ever find a solution to the Handle Exception. Error:Access denied error?
To add to my comment, it looks like the there is a disconnect with the website not passing the credentials down to SCCM to say my account is part of the AppReqWebsiteApprovers group.
I’m running Windows 2016 and SCCM 1706
Hi! Can I make the Licensing email to be the appover before the manager approved the requests?
i have create my custom approval script this week after tested a similar application with same prob of iis on 2016server… this problem is easyly bypassable(iis version key in registry) But it’s easy to handle the approval request with sccm powershell commanlet. The only mistake everyone made is the method used for identify if an email was already send or not for a request… Last run time, actual time minus $execFrequency or similar is heading for failure. my soluce is simple, database in form on a text-file…easy and powerfull.
Ok, so I managed to get this working on Server 2016 with CM version 1710. First off, I created the AppPool and then I installed the service and web site on a Windows 7 VM that had IIS installed. I used the server names for the real server when installing (not the VM). Once the install completed I copied the web site and Coretech folders to the 2016 server and I setup the Coretech service manually on the server (I examined the service in the VM and used SU to set it up the same on 2016 server). All went well until I got the first approval request and then I too received the “unable to login” message. I search around and though many people commented, no one posted a resolution. In the end my problem was that the CTAAWebsite was set to anonymous authentication=enabled. I examined the authentication for the site created on the VM and anonymous authentication was disabled and Windows authentication was enabled. As soon as I made this change and restarted the web site all began to work. I am so happy this us working and I have already modified the CSS to match our other CM site colors, look and feel. Great work Coretech team and I hope my comments help others.
Anyone found a solution with the portal from whatever access it I can only view content, but none of the approve, deny other buttons work.???
Please help us.
Hi @Christopher Bolton, does the portal working with you on CM version 1710 ???
Approve and deny buttons do not work.?!!!
Hi everyone,
My solution for install the tool on a Windows 2016 and SCCM 1806, as to edit de msi with Orca and change the Condition [VSDIISMSG] in the Table: LaunchCondition, to IISVERSION >= “#4” || IISVERSION == “#10”.
Thanks for sharing your thoughts on Alita Battle Angel 123 Movies.
Regards
Does not working on SCCM with users per device feature enabled