
This blog post deals with adding fake computers or users to a SCCM environment.
Why would you want to add fake clients to a SCCM environment?
You probably want to test something, maybe load test something, there can be multiple reasons.
But since you are here, you probably have a reason, so let’s move on 🙂
I use the CM Client API to create a resource and I say resource because it can also be a user in addition to a computer.
So, let’s start with the prerequisites so you don’t waste your time here.
- Configuration Manager Client Messaging SDK
From here, you actually only need the file ‘Microsoft.ConfigurationManagement.Messaging.dll’ - Configuration Manager PowerShell module
(Not required when using CmDeviceSeed.exe) - You need to be a full admin on SCCM – you know what that is.
- We will create a certificate that we will have to import into SCCM.
- CmDeviceSeed.exe requires at least .NET Framework 4.5.
First of all, we need to add a SCCM ISV Proxy Certificate.
That is a selfsigned certificate that we need to import into SCCM in order to create multiple resources.
If we don’t have that certificate, each time we add a resource, it will just overwrite the existing. Not much load testing it that, huh?
I always run my device seeder on the SCCM server, but guess you can do that from any machine.
Anyway, create the certificate on the machine you want to run the seeder scripts from.
Run the following PowerShell command to create a self-signed certificate:
New-SelfSignedCertificate -Type Custom -Subject "CN=CmDeviceSeed ISV Proxy Certificate" -KeyLength 2048 -KeySpec KeyExchange -KeyExportPolicy Exportable -FriendlyName "CmDeviceSeed ISV Proxy Certificate" -CertStoreLocation "cert:\LocalMachine\My"
This will place the certificate in the Machine part of the certicate store.
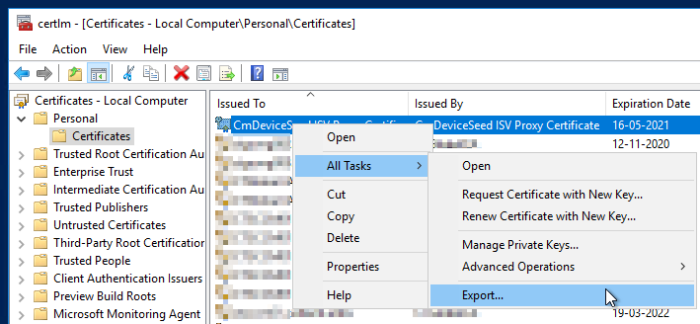
So open the certificate snap-in (Manager Computer Certicates), expand Personal and find the certificate we just generated.
We need to export that to a .cer file:
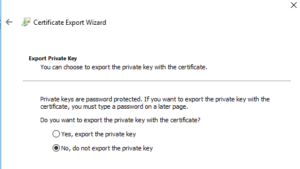
Export without exporting the private key:
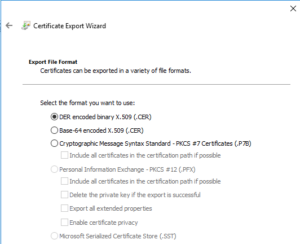
Select to export to a .cer file. Here, I selected the DER encoding, but Base-64 would probably work too:
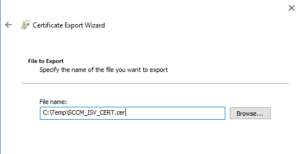
So, let’s finalize this:
Now we need to import that certificate into SCCM.
Open the Console and select the Administration workspace, navigate to Security -> Certificates.
From here, select Register or Renew ISV Proxy, select Register and locate the .cer file we just exported:
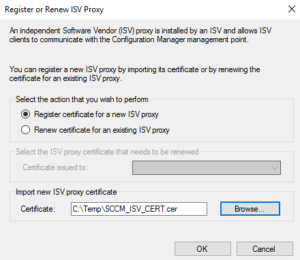
You should see that in the list as the type "ISV Proxy"

Did that work? If it did, we are so ready to create some devices!
Create basic computers
We want to see if we can add more than one computer in SCCM, so try that with a little help from the SCCM PowerShell Module.
Also, make sure you know where you put the file ‘Microsoft.ConfigurationManagement.Messaging.dll’ cause we need that now.
Do you know the site code of your ConfigMgr environment?
I hope you do or you shouldn’t be doing this 🙂
Anyway, nobody is perfect, so if in doubt, find it under the Site Configuration -> Sites:
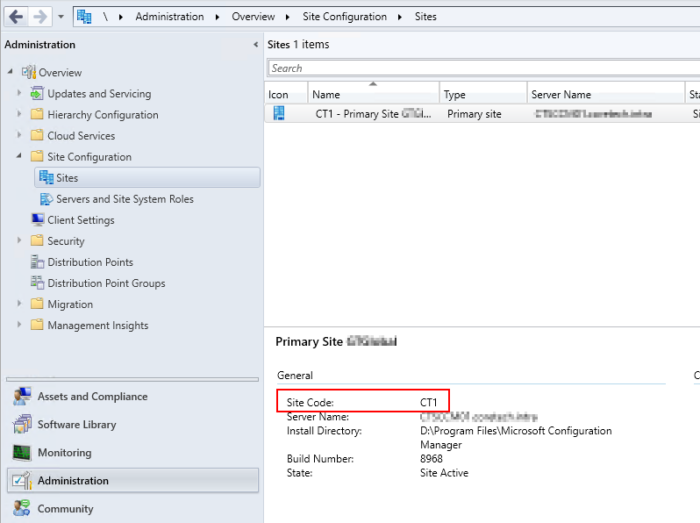
Got it? Great. Use this for the following PowerShell script along with the paths to the PowerShell Module and the Client Messaging SDK dll file:
 $siteCode = "CT1"
 $clientCount = 10
 $clientStartNumber = 1
 $clientPrefix = "WS"

 $modulePath = 'F:\CMDeviceSeed\Microsoft.ConfigurationManagement.Messaging.dll'
 $adminconsolePath = 'D:\Program Files\Microsoft Configuration Manager\AdminConsole\bin\ConfigurationManager.psd1'
 Import-Module –Name $modulePath
 Import-Module –Name $adminconsolePath
 Set-Location $siteCode":"

function CreateMACAddress()
{
    [int]$len = 12
    [string] $chars = "0123456789ABCDEF"
    $bytes = new-object "System.Byte[]" $len
    $rnd = new-object System.Security.Cryptography.RNGCryptoServiceProvider
    $rnd.GetBytes($bytes)
    $macraw = ""
    for( $imac=0; $imac -lt $len; $imac++ )
    {
        $macraw += $chars[ $bytes[$imac] % $chars.Length ]
    }
    $macaddress = $macraw[0]+$macraw[1]+":"+$macraw[2]+$macraw[3]+":"+$macraw[4]+$macraw[5]+":"+$macraw[6]+$macraw[7]+":"+$macraw[8]+$macraw[9]+":"+$macraw[10]+$macraw[11]
    Return $macaddress
}

 function CreateDDREntry()
 {
    param([string]$siteCode, [string]$computerName, [string]$MACAddress)
    [string[]] $macaddresses = $MACAddress
    $agentName = 'CMDeviceSeed Client Generator'
    $ddr = New-Object -typename Microsoft.ConfigurationManagement.Messaging.Messages.Server.DiscoveryDataRecordFile -ArgumentList $agentName
    $ddr.SiteCode = $siteCode
    $ddr.Architecture = 'System'
    $ddr.AddStringPropertyArray('MAC Addresses', [Microsoft.ConfigurationManagement.Messaging.Messages.Server.DdmDiscoveryFlags]::Array, 17, $macaddresses)
    $ddr.AddIntegerProperty('Active', [Microsoft.ConfigurationManagement.Messaging.Messages.Server.DdmDiscoveryFlags]::None, 1)
    $ddr.AddIntegerProperty('Client', [Microsoft.ConfigurationManagement.Messaging.Messages.Server.DdmDiscoveryFlags]::None, 1)
    $ddr.AddIntegerProperty('Client Type', [Microsoft.ConfigurationManagement.Messaging.Messages.Server.DdmDiscoveryFlags]::None, 1)
    $ddr.AddStringProperty('Operating System Name and Version', [Microsoft.ConfigurationManagement.Messaging.Messages.Server.DdmDiscoveryFlags]::None, 128, "Microsoft Windows NT Workstation 6.3")
    $ddr.AddStringProperty('Name', [Microsoft.ConfigurationManagement.Messaging.Messages.Server.DdmDiscoveryFlags]::Key -bor [Microsoft.ConfigurationManagement.Messaging.Messages.Server.DdmDiscoveryFlags]::Name, 32, $computerName)
    $ddr.AddStringProperty('Netbios Name', [Microsoft.ConfigurationManagement.Messaging.Messages.Server.DdmDiscoveryFlags]::Name, 16, $computerName)
    $ddr.SerializeToInbox()
    Return $true
 }

 for($i=$clientStartNumber; $i -le ($clientCount + $clientStartNumber -1); $i++)
 {
    [string]$mac = CreateMACAddress
    $iformat = "{0:D6}" -f $i
    [string]$name = $clientPrefix+$iformat
    Write-Host "Creating computer"$name "("$mac")"
    Import-CMComputerInformation -ComputerName $name -MacAddress $mac
    CreateDDREntry -siteCode $siteCode -computerName $name -MACAddress $mac
 }
Oh, explaination. Right.
So in the top of the script, I specified the Site Code and that I want to create 10 computers. The script has a numbering function, so I just specify what number to start with, 1 in this case.
Then the prefix of the computers, here ‘WS’, so the first should be named WS000001 and so on.
Then the path to the .dll and .psd1 files and we are done with the custom part.
You will notice two functions; one for creating a random MAC Address and one for creating the actual computer in SCCM.
We will skip the MAC function, the CreateDDREntry function is more fun.
You can set the Agent Name, it’s up to you what to call it. It will be added along the DDR entry.
Architecture is system for a computer.
Then comes the MAC Address some integer properties letting us decide if the computer should act as active and have an agent.
Of cause this is all fake, but still great!
Then we add the Operating System, here 6.3 means Windows 8.1 (yeah, it’s been a while since I created this script)
Feel free to create any OS you want 🙂
Did you run it? Sure you did!
Then you will see 10 new very fake devices in the console:
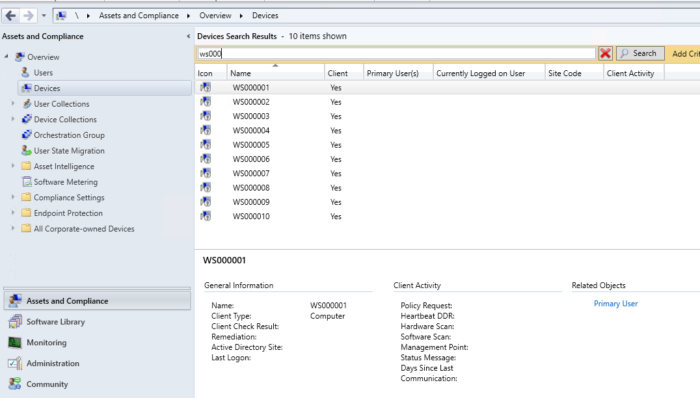
Awesome! You did it.
Want more? How about adding users?
Create users
Absolutely, here is a script for that, just creating some rnadom names:
 $siteCode = 'CT1'
 $domain = 'contoso'

 $userCount = 10
 $userStartNumber = 1
 $firstNames = "Bob","James","John","Frank","William","Peter","Carl","Andreas","Christian","Sally","Joan","Kelly","Jeniffer","Robert","David","Thomas","Kevin","Mary","Linda","Lisa","Maria","Sandra","Sharon","Laura","Kimberly"
 $lastNames = "Smith","Johnson","Williams","Jones","Brown","Davis","Miller","Wilson","Moore","Taylor","Anderson","Jackson","Harris","Lee","Morris","Nelson","Carter","King","Adams","Reed","Bell","Cooper","Gray","James","Ford"

 $modulePath = 'F:\CMDeviceSeed\Microsoft.ConfigurationManagement.Messaging.dll'
 $adminconsolePath = 'D:\Program Files\Microsoft Configuration Manager\AdminConsole\bin\ConfigurationManager.psd1'
 $addedUsers = New-Object 'System.Collections.Generic.HashSet[string]'
 Import-Module –Name $modulePath
 Import-Module –Name $adminconsolePath
 [Reflection.Assembly]::LoadWithPartialName("System.Web")

 function CreateDDREntry()
 {
    param([string]$siteCode, [string]$userName, [string]$fullName)
    $agentName = 'Skylon Client Generator'
    $ddr = New-Object -typename Microsoft.ConfigurationManagement.Messaging.Messages.Server.DiscoveryDataRecordFile -ArgumentList $agentName
    $ddr.SiteCode = $siteCode
    $ddr.Architecture = 'User'
    $ddr.AddStringProperty('User Name', [Microsoft.ConfigurationManagement.Messaging.Messages.Server.DdmDiscoveryFlags]::Name, 32, $userName)
    $ddr.AddStringProperty('Full User Name', [Microsoft.ConfigurationManagement.Messaging.Messages.Server.DdmDiscoveryFlags]::Name, 64, $fullName)
    $ddr.AddStringProperty('Unique User Name', [Microsoft.ConfigurationManagement.Messaging.Messages.Server.DdmDiscoveryFlags]::Key -bor [Microsoft.ConfigurationManagement.Messaging.Messages.Server.DdmDiscoveryFlags]::Name, 64, $domain.ToUpper() + "\" + $userName)
    $ddr.AddStringProperty('Windows NT Domain', [Microsoft.ConfigurationManagement.Messaging.Messages.Server.DdmDiscoveryFlags]::Name, 32, $domain.ToUpper())
    $ddr.SerializeToInbox()
    Return $true
 }

 if ($userCount -gt ($firstNames.Length * $LastNames.Length))
 {
    Write-Host "Max combination is"($firstNames.Length * $LastNames.Length)
    Exit
 }

 Set-Location $siteCode":"

 for($i=$userStartNumber; $i -le ($userCount + $userStartNumber -1); $i++)
 {
    #don't add users that already exists
    do
    {
        $rnd = Get-Random -Maximum $firstNames.Length
        $firstName = $firstNames[$rnd]
        $rnd = Get-Random -Maximum $LastNames.Length
        $LastName = $LastNames[$rnd]
        $FullName = $firstName + " " + $LastName
    } while ($addedUsers.Contains($FullName))
    $addedUsers.Add($FullName)

    $iformat = "{0:D4}" -f $i
    [string]$name =$firstName.Substring(0,1) + $LastName.Substring(0,1) + $iformat
    Write-Host "Creating user"$firstName $LastName" ("$name")"
    $complexPassword = [System.Web.Security.Membership]::GeneratePassword(14,5)
    #To create user in the AD, uncomment the next line
    #New-ADUser -Name $FullName -GivenName $firstName -Surname $LastName -SamAccountName $name -AccountPassword $complexPassword
    CreateDDREntry $siteCode $name $FullName
 }
You will notice I commented the New-ADUser out.
If you want (and have permissions) you can add the users to Active Directory too, but do remember to generate a complex password.
But where is the Hardware Inventory part the title promised.
I created a small console utility to push a hardware inventory file to the CM Management Point.
(Why not a PowerShell script? Simple. I am better with C# than with PowerShell, why I created the tool, but I’m sure it can be done with PowerShell too.)
Adding a computer with full hardware inventory
For this you will need to generate a hardware inventory file.
On a computer that has (a real) SCCM Agent open C:\Windows\CCM\Inventory\Temp
Look for the largest xml file.
None there?
Add an empty file named Archives_reports.sms in the folder and force a hardware inventory rerun. Then it should appear.
Open the xml file and verify it is a Hardware Inventory report.
Look for the InventoryAction section, the Description must say Hardware:

Now, copy that xml file to the folder where the file CmDeviceSeed.exe resides. Rename it to ‘hwi_template.xml’
Also in that same folder make sure you have the file ‘Microsoft.ConfigurationManagement.Messaging.dll’
Open a command prompt and run this command to create a computer and have it upload the hardware inventory:
CmDeviceSeed.exe CT1 -n WS000100 -invfile hwi_template.xml
The tool should output something like this:
CmDeviceSeed.exe CT1 -n WS000100 -invfile hwi_template.xml
Using certificate Site Server Signing Certificate, Thumbprint: 4CC44ECFD72CFA352422849A53AC95C3233CF785
Adding WS000100
Client Edition: Desktop
Registering client in Configuration Manager.
CmDeviceSeed.exe Warning: 0 : No certificate of type ManagementPointSigning was found.
Sending DDR for 'WS000100' to Configuration Manager
Sending Full Hardware Inventory for 'WS000100' to Configuration Manager
Heading over to the console, you will see the computer, but unfortunately there is no hardware inventory 🙁
Why is that, didn’t it send it?? Well, yes, but it is the hardware inventory for that other client we just copied it from, so SCCM doesn’t accept it.
Hmm, then we will have to open that xml file, search and replace the device name with the one we want to create. But that is how it is.
We can do that with a PowerShell script:
#---------- Variables ----------#
$xmlFilePath = "$PSScriptRoot\hwi_template.xml"
$sitecode = "CT1" #Required
$template_client_name = "CTFAC-T480S" #this is the name of the real client

$global:deviceName = $null
$global:hwInventory = $null
$global:isvGuid = $null

function Set-DeviceName {param([String]$Name)
    Write-Host $Name
    $global:deviceName = $Name
    Write-Host $deviceName
    #Replace the template DeviceName with the name of our device
    $con = Get-Content $xmlFilePath
    $con | % { $_.Replace($template_client_name, $Name) } | Set-Content $xmlFilePath.Replace("hwi_template",$Name)
    #Read content
    [XML]$hwInv = Get-Content –Path $xmlFilePath.Replace("hwi_template",$Name)
    $global:hwInventory = $hwInv
}

#--------- Execution entry point ----------#
if ([string]::IsNullOrEmpty($sitecode))
{
   Write-Host "You need to set the sitecode variable before running this script"
   Exit
}

Set-DeviceName -Name "WS000100"
$global:hwInventory.Save($xmlFilePath.Replace("hwi_template",$global:deviceName))
$invFile = $global:deviceName + ".xml"
.\CmDeviceSeed.exe $sitecode -n $global:deviceName -invfile $invFile -v
So the script replaces the device name with our fake device name, creates a xml file and uploads that along the DDR.
With some luck you should be able to see hardware inventory in the console:
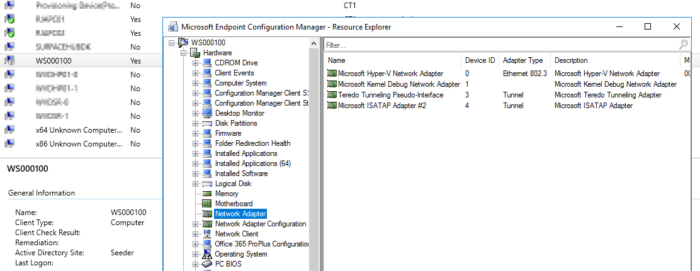
Now that we have the script to create a device, we can just extend that script to create a many devices as we want.
The CmDeviceSeeder util will make sure all fake devices will get a unique hardware id:
Guid guid = Guid.NewGuid();
configMgrRegistrationRequest.HardwareId = string.Concat("2:61A8C54D", guid.ToString().Replace("{", "").Replace("}", "").Replace("-", ""));
We completed the blog, you can now add fake devices with hardware inventory to do your testing.
Wanna do more customization?
Suppose you want to have unique hardware inventory?
Just manipulate the "template" xml file.
Say we want to add some common inventory like manufacturer, model, serialnumber, etc.
Let’s add a function to our script that can locate and replace as we want:
function Add-CommonInventory {param([String]$Manufacturer, [String]$ComputerModel, [String]$SerialNumber, [String]$AssetTag, [String]$OperatingSystem, [Long]$PagefileSizeMb)
    #Win32_ComputerSystem
    Select-Xml -Xml $global:hwInventory -XPath “//*[@Class='Win32_ComputerSystem']//Manufacturer” |
        foreach  { $_.Node.InnerText = $Manufacturer }
    Select-Xml -Xml $global:hwInventory -XPath “//*[@Class='Win32_ComputerSystem']//Model” |
        foreach  { $_.Node.InnerText = $ComputerModel }
    #Win32_SystemEnclosure
    Select-Xml -Xml $global:hwInventory -XPath “//*[@Class='Win32_SystemEnclosure']//Manufacturer” |
        foreach  { $_.Node.InnerText = $Manufacturer }
    Select-Xml -Xml $global:hwInventory -XPath “//*[@Class='Win32_SystemEnclosure']//SerialNumber” |
        foreach  { $_.Node.InnerText = $SerialNumber }
    Select-Xml -Xml $global:hwInventory -XPath “//*[@Class='Win32_SystemEnclosure']//SMBIOSAssetTag” |
        foreach  { $_.Node.InnerText = $AssetTag }
    #Win32_OperatingSystem
    Select-Xml -Xml $global:hwInventory -XPath “//*[@Class='Win32_OperatingSystem']//Caption” |
        foreach  { $_.Node.InnerText = $OperatingSystem }
    #CCM_LogicalMemoryConfiguration
    $PagefileSizeInBytes = $PagefileSizeMb * 1048576
    Select-Xml -Xml $global:hwInventory -XPath “//*[@Class='CCM_LogicalMemoryConfiguration']//TotalPageFileSpace” |
        foreach  { $_.Node.InnerText = $PagefileSizeInBytes }
}

Set-DeviceName -Name "WS000100"
Add-CommonInventory -Manufacturer "VMware" -ComputerModel "VMware7\x002C1" -SerialNumber "SN00001111" -AssetTag "AT00001111" -OperatingSystem "Microsoft\x0020Windows\x0020Server\x00202019\x0020Enterprise" -PagefileSizeMb 3583
Here we faked the computer to become a Windows 2019 Enterprise server running on VMWare.
But you can add more Disks, Memory, CPU, etc if you want:
function Add-RecentApp {param([String]$ProductName, [datetime]$LastRunDate, [int]$Instances)
$rnd = Get-Random
[xml]$recentAppXml = @"
    <Instance ParentClass="CCM_RecentlyUsedApps" Class="CCM_RecentlyUsedApps" Namespace="\\$global:deviceName\root\cimv2\sms" Content="New">
        <CCM_RecentlyUsedApps>
        <AdditionalProductCodes>
        </AdditionalProductCodes>
        <CompanyName>Microsoft\x0020Corporation</CompanyName>
        <ExplorerFileName>Virtual_$ProductName.exe</ExplorerFileName>
        <FileDescription>$ProductName</FileDescription>
        <FilePropertiesHash>289087c51e22eb9445b3e7ed30d1ee3f320426aee6893616070fba40$rnd</FilePropertiesHash>
        <FileSize>145088</FileSize>
        <FileVersion>10.0.14393.0</FileVersion>
        <FolderPath>C:\\Users\\ADMINI~1\\AppData\\Local\\Temp\\</FolderPath>
        <LastUsedTime>20010101000000.000000+000</LastUsedTime>
        <LastUserName>smdemo\\administrator</LastUserName>
        <msiDisplayName>
        </msiDisplayName>
        <msiPublisher>
        </msiPublisher>
        <msiVersion>
        </msiVersion>
        <OriginalFileName>Virtual_$ProductName.exe</OriginalFileName>
        <ProductCode>
        </ProductCode>
        <ProductLanguage>1033</ProductLanguage>
        <ProductName>$ProductName</ProductName>
        <ProductVersion>10.0.14393.0</ProductVersion>
        <SoftwarePropertiesHash>
        </SoftwarePropertiesHash>
        </CCM_RecentlyUsedApps>
    </Instance>
"@
  For ($i=$Instances; $i -ge 1; $i--) {
    [xml]$recentAppXmlModified = $recentAppXml.InnerXml.Replace('20010101000000.000000+000',("{0:yyyyMMddhhmmss.ffffff+000}" -f [datetime]$LastRunDate.AddDays(-$i +1)))
    $global:hwInventory.Report.ReportBody.AppendChild($global:hwInventory.ImportNode($recentAppXmlModified.Instance,$true))
  }
}

function Add-CPU {param([String]$Manufacturer, [String]$Model, [int]$Clockspeed, [int]$NumberOfCores)
[xml]$cpuXml = @"
  <Instance Content="New" Namespace="\\$global:deviceName\root\cimv2\sms" Class="SMS_Processor" ParentClass="SMS_Processor">
     <SMS_Processor>
        <AddressWidth>64</AddressWidth>
        <BrandID>0</BrandID>
        <CPUHash>1ee7b89482803efde3c20c87625cfe014f1e87ea3fb45c9b405347c6dd0f69ef</CPUHash>
        <CPUKey>000306C3</CPUKey>
        <DataWidth>64</DataWidth>
        <DeviceID>CPU0</DeviceID>
        <Family>198</Family>
        <Is64Bit>1</Is64Bit>
        <IsHyperthreadCapable>1</IsHyperthreadCapable>
        <IsMobile>0</IsMobile>
        <IsTrustedExecutionCapable>0</IsTrustedExecutionCapable>
        <IsVitualizationCapable>0</IsVitualizationCapable>
        <Manufacturer>$Manufacturer</Manufacturer>
        <MaxClockSpeed>2394</MaxClockSpeed>
        <Name>$Model</Name>
        <NormSpeed>$ClockSpeed</NormSpeed>
        <NumberOfCores>$NumberOfCores</NumberOfCores>
        <NumberOfLogicalProcessors>4</NumberOfLogicalProcessors>
        <PCache>0</PCache>
        <ProcessorId>0000000000000000</ProcessorId>
        <ProcessorType>3</ProcessorType>
        <Revision>15363</Revision>
        <SocketDesignation>None</SocketDesignation>
        <Status>OK</Status>
        <SystemName>$global:deviceName</SystemName>
        <Version/>
     </SMS_Processor>
</Instance>
"@
$global:hwInventory.Report.ReportBody.AppendChild($global:hwInventory.ImportNode($cpuXml.Instance,$true))
}

function Add-Disk {param([int]$Index, [String]$Manufacturer, [String]$Model, [long]$Capacity)
$capacityInBytes = $Capacity * 1073741824
[xml]$diskXml = @"
<Instance Content="New" Namespace="\\$global:deviceName\root\cimv2" Class="Win32_DiskDrive" ParentClass="Win32_DiskDrive">
    <Win32_DiskDrive>
        <Caption>Microsoft\x0020Virtual\x0020Disk</Caption>
        <Description>$Model</Description>
        <DeviceID>\\\\.\\PHYSICALDRIVE$Index</DeviceID>
        <Index>$Index</Index>
        <InterfaceType>SCSI</InterfaceType>
        <Manufacturer>(Standard\x0020disk\x0020drives)</Manufacturer>
        <MediaType>Fixed\x0020hard\x0020disk\x0020media</MediaType>
        <Model>$Model</Model>
        <Name>\\\\.\\PHYSICALDRIVE$Index</Name>
        <Partitions>3</Partitions>
        <PNPDeviceID>SCSI\\DISK_VEN_MSFT_PROD_VIRTUAL_DISK\\00000$Index</PNPDeviceID>
        <SCSIBus>0</SCSIBus>
        <SCSILogicalUnit>0</SCSILogicalUnit>
        <SCSIPort>0</SCSIPort>
        <SCSITargetId>0</SCSITargetId>
        <Size>$capacityInBytes</Size>
        <SystemName>$global:deviceName</SystemName>
    </Win32_DiskDrive>
</Instance>
"@
$global:hwInventory.Report.ReportBody.AppendChild($global:hwInventory.ImportNode($diskXml.Instance,$true))
}

function Add-Memory {param([int]$Index, [int]$Type, [String]$Label, [String]$Manufacturer, [String]$SerialNumber, [Long]$Capacity)
$capacityInBytes = $Capacity * 1073741824
[xml]$memoryXml = @"
<Instance Content="New" Namespace="\\$global:deviceName\root\cimv2" Class="Win32_PhysicalMemory" ParentClass="Win32_PhysicalMemory">
    <Win32_PhysicalMemory>
        <BankLabel>$Label</BankLabel>
        <Capacity>$capacityInBytes</Capacity>
        <Caption>Physical\x0020Memory</Caption>
        <CreationClassName>Win32_PhysicalMemory</CreationClassName>
        <Description>Physical\x0020Memory</Description>
        <DeviceLocator>M000$Index</DeviceLocator>
        <FormFactor>0</FormFactor>
        <InterleaveDataDepth>0</InterleaveDataDepth>
        <InterleavePosition>0</InterleavePosition>
        <Manufacturer>$Manufacturer</Manufacturer>
        <MemoryType>0</MemoryType>
        <Name>Physical\x0020Memory</Name>
        <PartNumber>None</PartNumber>
        <SerialNumber>$SerialNumber</SerialNumber>
        <Tag>Physical\x0020Memory\x00200</Tag>
        <TypeDetail>$Type</TypeDetail>
    </Win32_PhysicalMemory>
</Instance>
"@
$global:hwInventory.Report.ReportBody.AppendChild($global:hwInventory.ImportNode($memoryXml.Instance,$true))
}

Set-DeviceName -Name "WS000100"
Add-CommonInventory -Manufacturer "VMware" -ComputerModel "VMware7\x002C1" -SerialNumber "SN00001111" -AssetTag "AT00001111" -OperatingSystem "Microsoft\x0020Windows\x0020Server\x00202019\x0020Enterpriose" -PagefileSizeMb 3583
Add-CPU -Manufacturer "GenuineIntel" -Model "Intel" -Clockspeed 2000 -NumberOfCores 1
Add-CPU -Manufacturer "GenuineIntel" -Model "Intel" -Clockspeed 2000 -NumberOfCores 1
Add-Disk -Index 0 -Manufacturer "(Standard\x0020disk\x0020drives)" -Model "Disk\x0020Drive" -Capacity 79
Add-Disk -Index 0 -Manufacturer "(Standard\x0020disk\x0020drives)" -Model "Disk\x0020Drive" -Capacity 59
Add-Memory -Index 0 -Type 2 -Label "None" -Manufacturer "VMWare\x0020Virtual\x0020RAM" -SerialNumber "000000001" -Capacity 2
Add-Memory -Index 1 -Type 2 -Label "None" -Manufacturer "VMWare\x0020Virtual\x0020RAM" -SerialNumber "000000002" -Capacity 1
Add-RecentApp  -LastRunDate (Get-Date).AddDays(-1) -ProductName "Exchange Server 2016 Enterprise" -Instances 1
Add-RecentApp  -LastRunDate (Get-Date).AddDays(-1) -ProductName "SQL Server 2014 Enterprise" -Instances 10
$global:hwInventory.Save($xmlFilePath.Replace("hwi_template",$global:deviceName))
$invFile = $global:deviceName + ".xml"
.\CmDeviceSeed.exe $sitecode -n $global:deviceName -invfile $invFile -v
Last thing I wanna add is how to create a User/Device Affinity relation.
We will just add this directly into SCCM using WMI, so different for the above:
function Add-UserDeviceAffinity{ Param($SiteCode, $DeviceName, $UserName )
   $AffinityType = 2 # Administrator defined
   $CombinedResource = Get-WmiObject -Namespace "Root\SMS\Site_$SiteCode" -Class "SMS_CombinedDeviceResources" -Filter "Name='$DeviceName'"
   Invoke-WmiMethod -Namespace "root\sms\site_$SiteCode" -Class "SMS_UserMachineRelationship" -Name "CreateRelationship" -ArgumentList @($CombinedResource.ResourceID, $AffinityType, 1, $UserName)
}

    Add-UserDeviceAffinity -SiteCode $sitecode -DeviceName "WS000100" -UserName "contoso\bl0010"
I hope you liked this rather long post.
Download:
CmDeviceSeed
Who am I?
My name is Flemming Appelon Christiansen.
I am a developer at CTGlobal and have a long history with developing tools and apps for Configuration Manager and other management systems.
Currently very focused on our product Insight Analytics that you owe yourself to have a look at.
My experience comes out of interest and curiosity, probably just like yours 🙂


wow – after leaving MS world and moving to Linux it’s incredible how verbose MS scriptiong is…Really? so much work for simple things like mac addresses…
also – as ex SMS/Config/mgr/MSC Consolutant I find Ansible and Linux so much more refreshing and practical…
These tools have their place in the Corporate enclaves – but post Covid this world is chnanging…Hurry-up already!
Hi Flemming,
I am trying to get your script to work to add more than one device but I cannot seem to add more than one Device as the guid are the same.
Where do i add
Guid guid = Guid.NewGuid();
configMgrRegistrationRequest.HardwareId = string.Concat(“2:61A8C54D”, guid.ToString().Replace(“{“, “”).Replace(“}”, “”).Replace(“-“, “”));
to the script?
Thanks in advance
Hello,
Whenever the script for a device with full hardware inventory runs twice, the existing client from the first run gets overwritten in SCCM by the second client. Am I forgetting to set a variable??
Kind regards
Hello,
Whenever I run the script for a device with full hardware inventory twice, the first client from the first run gets overwritten by the second. Am I forgetting to set a parameter or doing something wrong?
I’ve also tried to run the tool on the CLI with -num and -sn parameters, but the NetBiosName is null.
Kind regards
I want thank you, for this detail article, I came from previous article of your and keep reading your blog.
Link is dead?
Try to update this post! Link do not work!