Previous: Continuous Delivery WebApps with ARM Templates, Part 1
Cross-posting from personal blog https://cloudmechanic.net
So it has been some busy months and therefor a bit delayed with this second post, but now I finally got a moment to finish it, so here we go!
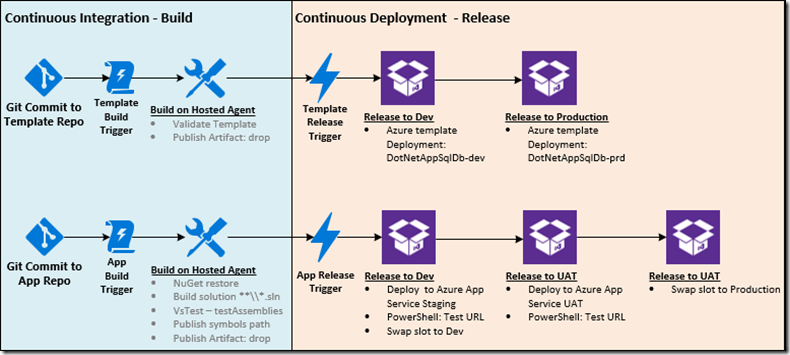
In the previous post we created and tested the continuous delivery pipeline for the Azure resources using a ARM template, and with the pipeline for deploying the Azure resources we are now ready to create the pipeline to deploy the application.

First you should go and grab the latest version of the ARM template and the Build and Release definition files from my GitHub repo here https://github.com/AndreasSobczyk/Continuous-Delivery-WebApps-Demo, and add them to the ARM template repo in your VSTS project.
Once you have the latest version in your repo you should trigger a build and release of the Azure resource using the pipeline created in the previous blog post.
Now we can start the pipeline creation for the application.
In VSTS go to Build and Release and select Builds, click the import button the top-right and browse to the local copy of the folder, and import DotNetAppSqlDb_App – CI.json, this will import the build definition for the application.
In the build definition on Process select Hosted VS2017 for agent queue, go to Get sources and ensure that the selected repository is the one that contains the application and not the template.
That is it for the build definition.
Like in the previous post, if you want to enable Continuous Integration for the application build go to the Triggers tab and enable it.
When done with everything save & queue the build definition, this will trigger a build of the application to validate the build definition is working and the application code is valid.
Now that the application build is done it is time to deploy it to Azure with the release pipeline.
Go to releases and import the release definition by clicking the + on the top-left corner and select Import release definition, browse to the BuildAndRelease Files and import the file DotNetAppSqlDb_App– CD.json.
The import should now give a release pipeline looking like the picture below. As this is only the shell of the pipeline we need to add in some information, I have again added some numbers to easier identify where to click.
First we need to add the artifact to deploy, click the box +Add artifact at 1 and select the build definition for the application (DotNetAppSqlDb_App – CI) previously created, ensure Default version is set to Latest.
Next click the lightning at 2. and ensure that After Release is selected to trigger the deploy to Dev when release is started, again you can also add Pre-deployment approvers if you want someone to review the deployment first.
Now click the 1 phase 3 tasks at 3. to configure the Dev deployment. Select Run on Agent phase and set Agent Queue to Hosted VS2017.
Go to Deploy Azure App Service and select the same Azure Subscription as in the release definition for the ARM template, enter the App Service name and Resource Group for the development environment, if you use same parameters as I do it should be DotNetAppSqlDb-dev for both fields, also enter the Deployment Slot name, default is Staging.
Next go to the step PowerShell: Test URL, this step contains a PowerShell Script that will validate that the newly deployed code is responding to with HTTP code 200, no additional configuration is needed.
Last in the Dev deployment is the step Swap slot to Dev, again select the same Azure subscription as in the release definition for the ARM template, and enter the App Service name and Resource Group for the development environment. For the source slot select Staging again.
This will swap the staging slot with the development production slot.
The Dev deployment is now configured and we can go to the User Acceptance Testing deployment, to switch to the UAT deployment click on Tasks in the top menu and select UAT
Also for the UAT slot, select Agent phase and set Agent Queue to Hosted VS2017.
Go to the step Deploy Azure App Service and select the same Azure Subscription as before, but enter the App Service name and Resource Group for the production environment, this would be DotNetAppSqlDb-prd if you use the same as I do, for the Slot select UAT.
Again there is a PowerShell step for validating response from the application after deployment.
Now is only left to configure the Production Deployment, click on Tasks in the top menu and select Production.
Again select Run on Agent phase and set Agent Queue to Hosted VS2017.
Select the step Swap slot to Prd and again select the same Azure Subscription as before, but enter the App Service name and Resource Group for the production environment, for the Source Slot enter the name for the previously select deployment slot UAT.
Everything for the release pipeline is now configured and you can click Save, and then release to trigger a deployment.
Again if you want to enable Continuous deployment to trigger the release automatically after each build you can click the lighting at the artifact and click Enabled, if you enable CD you can trigger the build instead and that will trigger the release when done.
With that we now have the entire build and deploy cycle automated in VSTS!
If both CI and CD is enabled you will now trigger a new build and release every time new code is committed to the repositories.
With everything defined in code you can now also easily roll back to a previous version, deploy more instances or to new regions.
Next up will be using this same pattern to deploy to Azure Stack, but more on that next year.


![clip_image001[3] clip_image001[3]](https://blog.ctglobalservices.com/wp-content/uploads/2017/12/clip_image0013_thumb.png)

