When testing your different deployment scenarios eg. Task Sequences, you normally create a Test collection, and associate a test PC to that collection.
Now ones the PC has successfully carried out the steps in the TS, you might want to change some thing, and then run the TS again. You now find that the test PC does not work any more, and you have to associate the PC all over again.
Why does this happen!
The PC receives a new GUID during deployment, and therefore, the original associated PC will become obsolete. The PC (obviously still with the same MAC and name) will be re quarried by SCCM and placed in a collection according to what ever discovery setup you are running.
This is actually an good thing as we normally do not want our image TS to be advertised to the PC ones it has been re-imaged, unless we are in a test environment…
What do we do to work around this!
Fairly simple actually. We create a query in our collection that put’s the test PC back in our Test collection.
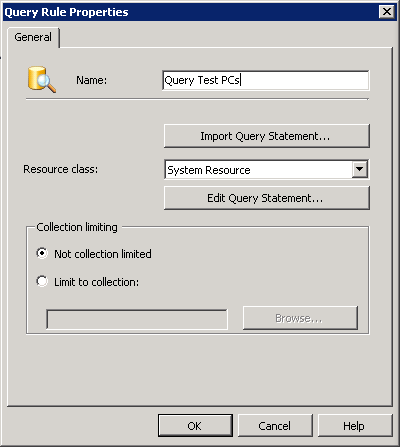
1. Right click your collection and choose Properties
2. On the Membership Rules tab, click the yellow cylinder ![]() to create a new Rule.
to create a new Rule.
3. Type in a name, and choose System Resource as Resource class, then click Edit Query Statement
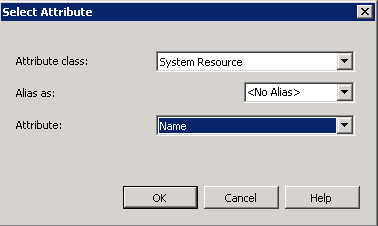
4. On the Criteria tab, click the yellow starburst ![]()
5. Make sure Criterion Type: is Simple Value, and click Select…
6. Set Attribute class: to System Resource, and Attribute: to Name
7. back in Criterion Properties, set Operator: to is equal to and in Name: type in the name of your Test PC

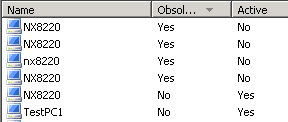
now all you have to do is update the collection membership, and the PC with the new GUID will be placed in your test collection. You will still se the old PC which is obsolete, where as the newly queried PC is Active.
Be aware that this query does not remove the obsolete PC’s so you could wind up having several of the same PC names in your collection, but you can always sort the Obsolete column to se if your Test PC is active

