I have had a lot of questions about how I automate the creation of Hyper-V guests, and start a specific MDT task sequence using PowerShell.
Well in this post I will try to walk you through it step-by-step.
Preparing MDT Deployment Share
I won’t go into detail about setting up your MDT share, there are plenty of other blog posts out there, that describes how to do that.
What I will show you is the content of my rules files that fully automates the build process.
BootStrap.ini
This is the settings that we alter from Edit bootstrap.ini button on the rules tab on the properties dialog of our deployment share. These are the settings that gets injected into the boot media, and allows the task sequence engine to connect to your deployment share.
[Settings]
Priority=Default

[Default]
SkipBDDWelcome=YES
DeployRoot=\\MyLaptop\MDTShare$
KeyboardLocalePE=0409:00000409
UserDomain=MyLaptop
UserID=MDTUser
UserPassword=S0meSecretPassw0rd
CustomSettings.ini
this is the settings that we alter from the rules tab on the properties dialog of our deployment share.
[Settings]
Priority=Init,TaskSequenceID,Default
Properties=MyProp1

[Init]
ComputerBackupLocation=\\MyLaptop\MDTShare$\Captures
SLShare=\\MyLaptop\MDTShare$\Logs
UserExit=LoadTSFromMac.vbs
TaskSequenceID=#SetTSFromMac()#

[W81ENTX64EN]
BackupFile=Windows 8.1 Enterprise x64 EN Thin.wim
DoCapture=YES

[W10ENTX64EN]
BackupFile=Windows 10 Enterprise x64 EN Thin.wim
DoCapture=YES

[Default]
UserID=MyLaptop\MDTUser
UserPassword=S0meSecretPassw0rd
_SMSTSOrgName=My Automated Deployment
SMSTSErrorDialogTimeout=0
SMSTSDownloadRetryCount=5
SMSTSDownloadRetryDelay=15
;WSUSServer=http://mywsusserver.domain.local:8530
OSDComputerName=%TaskSequenceID%
JoinWorkgroup=MDT
AdminPassword=
BitsPerPel=32
VRefresh=60
XResolution=1
YResolution=1
KeyboardLocale=en-US
UserLocale=en-US
UILanguage=en-US
TimeZoneName=Pacific Standard Time

OSInstall=Y
FinishAction=SHUTDOWN

SkipBDDWelcome=YES
SkipTaskSequence=YES
SkipCapture=YES
SkipComputerName=YES
SkipDomainMembership=YES
SkipAdminPassword=YES
SkipProductKey=YES
SkipComputerBackup=YES
SkipBitLocker=YES
SkipUserData=YES
SkipPackageDisplay=YES
SkipApplications=YES
SkipLocaleSelection=YES
SkipTimeZone=YES
SkipRoles=YES
SkipSummary=YES
SkipFinalSummary=YES
These settings will be processed as specified in the Priority key in the [Settings] section, Basically what is does is that it provides all the answers that the wizard would ask us during the task sequence execution, and suppresses the wizard so it runs fully unattended. All of these settings are described in the MDT documentation, so if you want to learn more about the individual settings, please read this as it provides all the information you need.
One thing that I will tell you about is the [Init] section: This section is special, as I call a custom UserExit script…
UserExit script
this script is the one that does the magic in terms of binding the Mac address of the Hyper-V guest that you create, to a specific task sequence ID that the guest should start to process.
The UserExit=LoadTSFromMac.vbs line tells MDT that it should use the following script, and the TaskSequenceID=#SetTSFromMac()# line tells MDT that it should assign the output value from the SetTSFromMac() function in the script, to the task sequence variable named TaskSequenceID.
The script file is named LoadTSFromMac.vbs and is placed in the script folder under your deployment share.
Function UserExit(sType, sWhen, sDetail, bSkip)

    oLogging.CreateEntry "UserExit: LoadTSFromMac.vbs started: " & sType & " " & sWhen & " " & sDetail, LogTypeInfo
    UserExit = Success

End Function

Function SetTSFromMac()

    Dim oFile
    Dim sMacAddress
    Dim sTSID
    Dim sLogShare
    Dim sFile
    Dim xmlDoc, colNodes, oNode

    sTSID = ""
    SetTSFromMac = ""
    oLogging.CreateEntry "UserExit: Running function SetTSFromMac ", LogTypeInfo

    sMacAddress = oEnvironment.Item("MacAddress001")
    sLogShare = oEnvironment.Item("SLShare")
    oLogging.CreateEntry "UserExit: MacAddress is: " & sMacAddress, LogTypeInfo
    oLogging.CreateEntry "UserExit: Logshare is: " & sLogShare, LogTypeInfo

    'strip : from MacAddress
    sMacAddress = Replace(sMacAddress,":","")
    oLogging.CreateEntry "UserExit: Stripped MacAddress is: " & sMacAddress, LogTypeInfo

    sFile = sLogShare & "\" & sMacAddress & ".xml"

    If (oFso.FileExists(sFile)) Then
        oLogging.CreateEntry "UserExit: File found: " & sFile, LogTypeInfo
        'Set xmlDoc = CreateObject("Microsoft.XMLDOM")
        Set xmlDoc = CreateObject("MSXML2.DOMDocument")
        xmlDoc.Async = "False"
        xmlDoc.Load(sFile)

        Set colNodes = xmlDoc.selectNodes("/Build [MacAddress = '" & sMacAddress & "']/TaskSequenceID")

        For Each oNode in colNodes
           sTSID = trim(oNode.Text)
        Next

        oLogging.CreateEntry "UserExit: TSID is: " & sTSID, LogTypeInfo
        SetTSFromMac = sTSID

    Else
      oLogging.CreateEntry "UserExit: File not found: " & sFile, LogTypeInfo
    End If
    oLogging.CreateEntry "UserExit: Ended...", LogTypeInfo
End Function
The script reads the MAC address of the first adapter in your Hyper-V guest and removes the semicolons, then the script tries to locate an xml file with that name in the logs directory under the deployment share, specified by the SLShare task sequence variable. So if your adapter has a MAC address of 11:22:33:44:55:66 it will look for a file named 112233445566.xml. in that file you need to specify the task sequence ID of the sequence you want to start, in this case the sequence with the ID ‘W10ENTX64EN’.
<?xml version="1.0"?>
<Build>
  <MacAddress>112233445566</MacAddress>
  <TaskSequenceID>W10ENTX64EN</TaskSequenceID>
</Build>
Setting up Hyper-V
Next you need to setup your Hyper-V environment.
First you have to add the Hyper-V role to your workstation, in this example I’m using my Windows 10 laptop for the purpose. I won’t go into details about adding the role as this should be a trivial task.
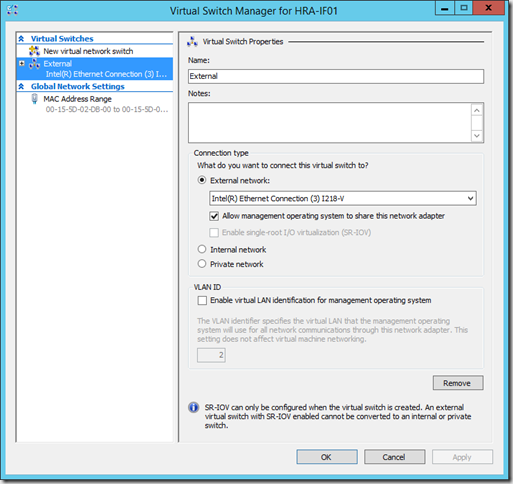
Once the role is installed, you will need to start the Hyper-V Manager and open the Virtual Switch Manager dialog. Here you will need to add a new Virtual Switch that connects to your Ethernet adapter to allow the guest to obtain an IP address from your DHCP server, and connect to your MDT deployment share.
PowerShell script
Now on to the task of automating it all.
Create the Hyper-V Guest
First we need to create the Hyper-V guest: this is done using the New-VM cmdlet. this takes a few arguments that we need to supply:
- Name – the name of the guest. This will be set to the same name as our MDT task sequence ID, this way it will be easy to identify which task sequence a given guest will process.
- MemoryStartupBytes – amount of memory to assign to the guest.
- SwitchName – the name of the virtual switch you created earlier.
- NewVHDPath – name and path of the vhd file of the virtual hard disk.
- NewVHDSizeBytes – Size of the virtual hard disk.
- Path – The root path to where the guest files should be created.
So by executing the following code, you will have a new Hyper-V guest:
$VMName = 'W10ENTX64EN'

$VM = New-VM –Name $VMName –MemoryStartupBytes 5GB -SwitchName 'External' `
            -NewVHDPath "C:\MDT-VMs\$VMName\Virtual Hard Disks\$VMName.vhdx" `
            -NewVHDSizeBytes 60GB -Path 'C:\MDT-VMs'
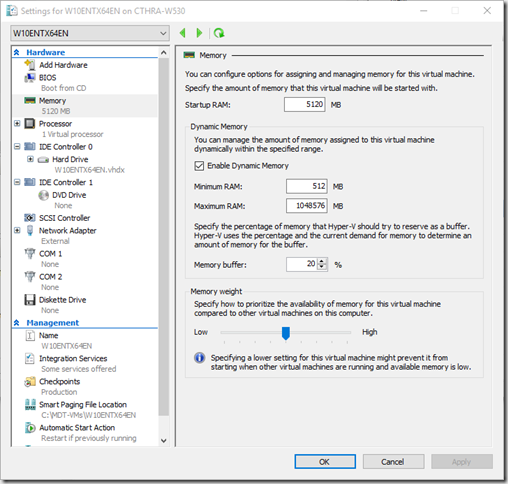
Lets take a look at the settings of the newly created guest.
As you can see, the guest was created and the startup RAM was assigned 5GB as you specified.
Changing the guest settings
There are still some settings that we need to change before we can use it for our purpose of processing the task sequence.
Dynamic Memory needs to be disabled (Windows 7 issue)
- Increase the number of processors
- MDT Boot media needs to be mounted to the DVD drive so the MDT process can start
- Get the MAC address of the Guest and write that to the xml file that links the guest to the task sequence
We can use the Get-VM cmdlet to connect to an existing Hyper-V guest, and use the returned object to change settings as shown in the script below:
$VMName = 'W10ENTX64EN'

#Get the VM guest
$VM = Get-VM -Name $VMName

#Set the boot media
Add-VMDvdDrive -VM $VM -Path 'C:\MDTShare\Boot\LiteTouchPE_x86.iso'

#Set number of processors
Set-VMProcessor -VM $VM -Count 2

#Disable dynamic memory
Set-VMMemory -VM $VM -DynamicMemoryEnabled $false
Getting the Mac Address
So now you have the Hyper-V guest setup and the MDT environment configured, all there is left to do is to get the Mac address from the guest and save it along with the task sequence id in an xml file, for the UserExit script to pick up.
First we need to get the Mac address of the new guest VM you created, here we can use the Get-VM cmdlet again.
$VMName = 'W10ENTX64EN'

#Get the VM guest
$VM = Get-VM -Name $VMName

#Get the mac address and write it out
$MacAddress = $VM | Get-VMNetworkAdapter | foreach { $_.MacAddress }
$MacAddress
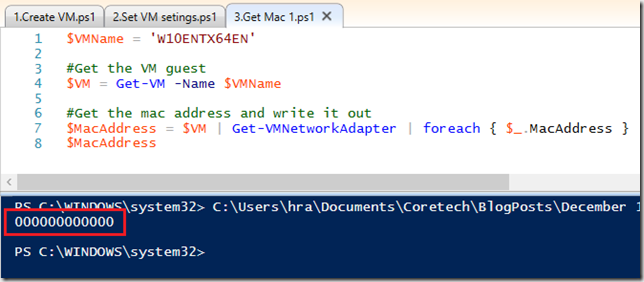
Now let’s execute that script and see what we get:
But hey! that MAC address can’t be right?
Well no, this is due to the way that Hyper-V assigns MAC adresses to its guests. An address will first be assigned once the gust is started first time…
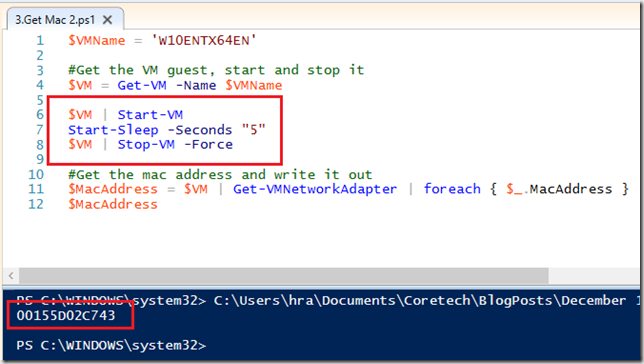
So how do you get the MAC then? well there is an easy way to fix this, you simply start the VM and shut it down again.
$VMName = 'W10ENTX64EN'

#Get the VM guest, start and stop it
$VM = Get-VM -Name $VMName

$VM | Start-VM
Start-Sleep -Seconds "5"
$VM | Stop-VM -Force

#Get the mac address and write it out
$MacAddress = $VM | Get-VMNetworkAdapter | foreach { $_.MacAddress }
$MacAddress
And the result:
Writing to xml file
So all we need to do now is to write the Mac Address and the Task Sequence ID to an xml file that the UserExit script can pick up.
For this we use an xml document to add a few elements and save. I will not go into details about the System.Xml.XmlDocument object, just show you how it’s done.
$VMName = 'W10ENTX64EN'

#Get the VM guest, start and stop it
$VM = Get-VM -Name $VMName

$VM | Start-VM
Start-Sleep -Seconds "5"
$VM | Stop-VM -Force

#Get the mac address
$MacAddress = $VM | Get-VMNetworkAdapter | foreach { $_.MacAddress }

#specify where xml file name
$mappingFile = "C:\MDTShare\Logs\$($MacAddress).xml"

#create xml document and populate it
[System.XML.XMLDocument]$XMLDoc=New-Object System.XML.XMLDocument
[System.Xml.XmlDeclaration]$XMLDec=$XMLDoc.CreateXmlDeclaration("1.0",$null,$null)
[System.XML.XMLElement]$XMLRoot=$XMLDoc.CreateElement("Build")

$null = $XMLDoc.AppendChild($XMLDec)
$null = $XMLDoc.appendChild($XMLRoot)

[System.XML.XMLElement]$XMLmac=$XMLRoot.appendChild($XMLDoc.CreateElement("MacAddress"))
$XMLmac.InnerText = $MacAddress

[System.XML.XMLElement]$XMLTSID=$XMLRoot.appendChild($XMLDoc.CreateElement("TaskSequenceID"))
$XMLTSID.InnerText = $VMName

# Save xml file
$XMLDoc.Save($mappingFile)
So now we have our mapping file:
and the content:
Start the build process
So all you need to do now is to start the Hyper-V guest and watch the magic take place.
$VMName = 'W10ENTX64EN'

#Get the VM guest and start it
$VM = Get-VM -Name $VMName
$VM | Start-VM
Final words
Well this was a short guide in how to create automatic builds of MDT task sequences. Although these script snippets does the job of creating the VM and starts the build, there is still a lot of plumbing code that needs to be written, the scripts shown here does not handle cleanup after the build, nor does it have any error handling implemented. this will have to be implemented if the scripts should be used in production.
Coretech has created an ImageFactory that handles the automatic build of multiple reference images, where all the plumbing is complete. this ImageFactory will perform the following steps.
- Build thin reference images based on original media with all updates, .NET Frameworks and C++ runtimes applied
- Build hybrid images including etc. Office with updates, based on previous build thin images
- Perform cleanup before resealing images
- Allow exclusion of unwanted updates
- Copy captured image to Configuration Manager OS Image packages and update content
- Create logs of the entire process that can be used in troubleshooting
If you want to learn more about this solution, please contact us.




… [Trackback]
[…] Read More on|Read More|Find More Informations here|There you will find 9026 additional Informations|Infos to that Topic: blog.ctglobalservices.com/powershell/hra/december-16th-create-hyper-v-guests-using-powershell/ […]
I’ve been using this great tool for several years now, but when trying to update my thin image to Windows 10 1709 it wont work..
I can see it tries to install the feature update and the step takes for hours, but its never applied to the image..
I recently updated the ADK to 1709, but it still wont work..
Anyone with the same problem?