What you will be able to after reading this blog:
- Get the latest information about “your” Signature- & Anti Virus reports in Windows Defender and make it into a text file.
- How to automate it, so it will run every day and give you a status report with time and date.
- Being able to look at what time and date the latest updates have been completed.
First of all, we have to create a folder/directory where the status reports can be stored in.
Open up PowerShell in administrative mode and run this script only by copy-paste:
$path="C:\"
   New-Item .\AVStatusReports -ItemType Directory -Force
Now that the folder has been created in your c:\ , we can proceed to the next step.
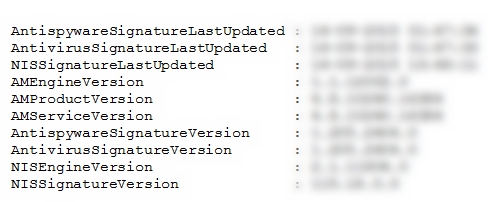
What we want is a report of the versions of the current Anti-Virus States.
So we are selecting *updated and *version to get into our text file that we want every day – Here’s what it looks like:
Get-MpComputerStatus | select *updated,*version | Out-File C:\AVStatusReports\StatusReport.txt
I bet you get the idea by now, so why don’t we just add the time. Make it into the file and make it run every day so we have a complete status.
By using this script you will always be able to see what’s updated and which version you are currently running.
So let’s watch the full script and get into details:
Get-MpComputerStatus | select *updated,*version | Out-File C:\AVStatusReports\StatusReport.txt

[string]$filePath = "C:\AVStatusReports\StatusReport.txt"
$item = get-item $filePath
[string]$newFileName = $item.BaseName + (Get-date).ToString("ddMMyyyy-HHmmss") + $item.Extension
$newFilePath = Join-Path  $item.DirectoryName $newFileName

Move-Item -LiteralPath $filepath -Destination $newFilePath;
Now we have added a file path to the folder we created earlier.
We are binding the filepath to the directory name which is AVStatusReports and makes the status reports get stored in the folder.
With this script we are adding Date, Month and Year and also the time of every report in the text name.
Now this is just the script you can run if you want a one-time status report.
But if you want to automate this, and make it run every day like me – you can do it through “Task Scheduler“.
Here is what you have to do:
- Go to windows and search for: Task Scheduler
- When it’s open, click on “Create Task” and a new box should be open.
- Write the name of your task, but for now call it Anti-Virus Status Report
- Write any description and click on “Change User or Group…” and select the users and groups you want to be affected by this script.
- Select (*) Run whether user is logged on or not
- Configure for: *Change it to what fits your clients*
- Click on “Triggers” and then on “New“. Select *On a schedule* and then below click on Daily/Weekly/Monthly.
- Go to advanced settings and select Stop task if it runs longer than: 30 minutes (Depends on what you are doing)
- Last but not least, select Enabled if it’s not already picked and click “OK”.
- Click on Actions and click New and write in the name of the program you are using – example: PowerShell.
- On Add arguments write the name of your saved script: .\AVStatusReports.ps1
- On Start in write the location for where you saved the script – example: C:\Scripts\Tutorial
- And click “OK”
When you continue, you are now able to select your own options and what fits your schedules best.
When you are done, click OK and now you have created an automated script which runs every day/week/month
![]()
Now you will be able to see the updates and the versions just by going to the folder and click on the date you want to see

I hoped this quick tour was helpful. If you have any questions do not hesitate to comment below!
Have a nice day,
Alexander Gundelack Jensen


vraiment, j’ai l’honneur de visiter votre blog.
This is really an interesting one, can you guide me how can pull these information to a database.